200 hour training Questions

200 hour training

IS IT RIGHT FOR YOU? TOP 3 QUESTIONS ANSWERED


THE BIG DECISION

You are likely here because you have been considering taking your 200-hour training but you aren’t sure if it’s right for you, what you will learn, who you should take it with, or where you should go to take it. It is a big decision and a commitment that is worth taking the time to research, so thank you for stopping by and taking a moment to learn a little more about it. In the video below I go over the top 3 questions that I get whenever students are interested in taking a 200-hour training with me. In addition, I talk about my #1 tip to consider when searching for the right one for you.

Underneath the questions are some primary concerns that I would like to discuss here before you watch the video. This decision is likely challenging for you because it is a large investment of either your time or money or both. These are two energies in life that are precious. For some of you, money isn’t an issue and for others, you may have all the time in the world, meanwhile, some of you have no money and no time, so why spend both on a 200-hour training? This is what your mind has been saying has it not? On the other hand, something inside you is being pulled toward a training and you can’t help but look around for answers.

NO TIME, NO MONEY.

I personally remember my experience. I was a full-time touring musician in a moderately successful band on the rise. It had been 7 going on 8 years of committing to this dream of ours, and we were so close to our big break. I had informally begun teaching in my mother’s basement to my friends and their friends while we were in the studio recording our next album. During the recording was the longest stretch of being home that we had had in years of being in the band together. I rapidly fell in love with teaching and my classes went from one a week with 5 friends to 4 a week with 30 eager yogis. I was being asked to sub at local gyms and studios, as well as lead events for Lululemon. There was a part of me that felt like I was lying. I had never done a teacher training before and I wasn’t certified to teach. I worried about people finding out, and I wanted to do a teacher training. The only challenge was, after being in a band for so long, I never really had any money, and at the same time, we were about to complete our album and head out on the road for a year of nonstop touring. I never did make the decision for myself and as a result, I was constantly feeling torn between the commitment I made to myself and my bandmates several years prior and my current passion for sharing the practice of yoga. Emotionally I was now feeling stressed and isolated. I was no longer “living the dream.” I was living yesterday’s dream which was today’s nightmare of feeling trapped. Eventually, life chose for me. My singer had been asked to go on American Idol which was both an opportunity for him and potential mass exposure for us. We all agreed to cancel several months of touring for him to focus on American Idol. I was quietly jumping out of my skin for the chance to have enough time to do a training. I now had the time but still…no money. Out of happenstance and desperation on the part of the studio, I had the opportunity to sub for one of my teachers at Pure Yoga in Manhattan. Afterward, the studio received several requests to have me teach full time. They instantly hired me, however, when they asked where I took my training, I couldn’t lie. I told them I wasn’t certified to teach. They told me I would be hired as soon as I finished my training. My teachers and friends knew of my financial situation, so they pulled together and did fundraiser events for me, while I reached out to my friends and family for support. Thankfully I was able to jump into my first official teacher training, and from there I started my career in Manhattan. Choosing a training was easy for me. My teachers were all co-leading a training at Pure Yoga for the first time and they had worked hard to get me into the training. Which leads us to my number one tip for choosing a training. Watch the video to find out!

The reason I share this story is for two purposes. First, take your time making the choice but don’t wait so long that life has to do it for you. If you do this, you will feel months or years of being emotionally torn and no matter how much you justify your indecision, you will ultimately feel it. Second, you will find a way to make it work. Once you make the decision you will find a way to work out the time or the money. Be solution-oriented instead of identified with the problem. Yes, there is a problem, no time and/or no money, but instead of letting it define your actions, let it spark your creativity to find a way. Talk about it with friends, family members and teachers, take suggestions and figure out how to integrate them. You will find a way!

BEGINS OCTOBER 1ST 2020

WHAT ABOUT ONLINE YOGA TRAININGS?


Covid19 was a wake-up call for most people, and the yoga industry was no exception. Out of necessity, yoga teachers have shifted to platforms like zoom in order to continue sharing the practice. Yoga Teacher Trainings were canceled, postponed, and some took the initiative to go against the grain and go online. Many teachers disagreed with the decision of others to offer teacher trainings presenting the argument that you cannot get the same experience online as in person, the interpersonal connections that happen in person in particular. The other side of the argument is how much more effective online education is when presented properly. The real question is, can teachers create a powerful and effective experience for students to transform the way they move in their body, develop greater awareness and freedom mentally and emotionally through introspection and self-inquiry, and ultimately attain the skills to share the practice with others?   

The teachers that focus on the experience they want to deliver and the intention behind that can use technology to their advantage. Everything is possible when looking at possibilities. The teachers that don’t consider the online platform and its capabilities will likely fall short. Of course, there are the rare marketing-driven companies that simply hold the intention to make a profit off of a need. There is nothing wrong with this if they are also offering a high-quality experience delivered from a seasoned or teaching team that has mindfully put together a curriculum that is effective online. Just like with in-person trainings, both exist.
How To Choose an Online Training 

When choosing an online training that is right for you, I suggest speaking with the lead teacher directly and getting your questions answered. Ask yourself what your main objectives are for doing a teacher training. What are your main concerns? What is important to you when it comes to learning from a yoga teacher? Do you want to be a teacher or just advance your practice? What are you most scared of? What excites you the most about doing a teacher training? Get clear so you can see which training resonates with you the most.

Is it Possible to Have Interpersonal Connection Online?

The major challenge with creating REAL CONNECTIONS online in teacher trainings is getting students to get comfortable being themselves on camera. The training here on theyogimatt.com focuses on this throughout both the 200 hr and 300 hour online in a few particular ways. First, we set the intention – put it out on the table that almost everyone feels uncomfortable on camera, especially talking to the camera. We break the ice and learn the basics of filming ourselves. We have one on one, small group, large group, and Facebook group conversations over video. The multiple methods provide a safe space to get comfortable sharing truthfully and honestly. Everyone is encouraged to simply show up imperfectly and courageously. When it comes to submitting teaching videos, students have the opportunity to film and re-film multiple times prior to submission which serves as a great training ground for practice. We share sequences, reflections on philosophy, meditation, anatomy, and life. In short, we hold the intention to connect with one another! If connection is important to you then be sure to find a training that holds that intention.

“I am not advanced in my yoga practice. Is this right for me?”

TOP 3 QUESTIONS

Out of the challenges of time or money many questions will arise as to whether or not the 200-hour training is right for you. Before we get to them, consider what your life is like with the practice of yoga in it. What would it be like without it? After a 200 hour training, you will have a similar feeling about the experience when thinking about your life before the training and after. You will more than likely feel so grateful that you took the dive into your practice and found a way to make it happen. Let’s go over the top 3 questions.


1. I am not an advanced practitioner, will I be able to keep up?

I say absolutely. In my 200 hour training, you learn how to teach the practices/skills/postures that you are most proficient at. Rather than trying to teach something that you have not yet developed in your practice, you will learn how to share your strengths with your students. At the same time, you will be taking steps to advance your personal practice appropriately. This means you will begin your advancement based on where your practice is when you step into the training. You will not be expected to live up to anyone else’s potential but your own. You will not be held to anyone else’s standard for practice but yours. So long as you have a curiosity and desire to deepen your practice, then you are right on track with where you need to be for this training. If attending a training elsewhere, be sure to direct this question to the lead teacher. Also, be sure to familiarize yourself with the lead teacher’s style either in person or online before diving into training with them.

2: I want to deepen my practice but don't want to teach is that ok?

I would guess that only about 10% of people that take 200 hour trainings go on to actually teach yoga full time, and maybe about 50% share the practice in some way as a way of offering to their community, friends or family. The majority of people take 200 hour trainings in order to deepen their study of themselves as it is the best way to fully immerse yourself into the yoga practice without having to leave society and find your yoga master in a cave in the middle of nowhere. This doesn’t mean you won’t teach or that you won’t be prepared to teach, however, it’s best to let this question be answered by the end of your training instead of worrying about it upfront. Do the 200-hour training if you want to go deeper into yourself and your yoga practice. Do it to become more aware of your physical body, emotions, and mind. Do the training to learn the skills of sharing your passion with others to support them in feeling good in their body and mind, but release yourself from any pressure that says you have to do or be anything or anyone that you don’t want to.


3. will i be qualified and certified to teach yoga classes from this training?

Most 200-hour yoga trainings out there are recognized by Yoga Alliance, which means you will be registered with YA. What does this mean? In reality, it means nothing in terms of the quality of the trainings it simply means that the lead teacher or studio pays Yoga Alliance. For you, however, it may be important as you are establishing yourself to be with Yoga Alliance. Some gyms and studios require it. All of my trainings are recognized, and therefore you will be able to register with them as well. If you are to spend the money on certification, you might as well have it be a Yoga Alliance recognized training so you can take your certification anywhere. Qualified is different than certified. Qualified means you are ready to teach and share the practice of yoga with others. This is my highest aim – I want every trainee to feel confident in their ability to share this practice by the end of the training. Regardless of if you decide to teach or not, you will feel comfortable by the end of this training to pass along the beauty of this practice with others around you!

200 HOUR ONLINE 

TEACHER TRAINING COURSE

200 hour

IS IT OK TO DO  TRAINING ONLINE?

There are a few factors that come into play with this question. First the teacher and the curriculum they have created. If the teacher knows how to leverage the online platform to the advantage of the students with video editing, course structure, quiz, video submissions, Facebook groups, video messaging, and so on then it’s likely that they can deliver a powerful course that does what in-person trainings could never do. If the teacher is new to the online platform, does not leverage course software, and does not know how to transmit their curriculum and take full advantage of what the internet has to offer then it’s not likely to be a great experience.

Speaking for the 200 Hour Training Online here on theyogimatt.com we have put together a training that takes the 10-year time-tested curriculum and made it even better. The best part is you can watch and rewatch videos, and repeat quiz questions until you have mastered the content provided. In these trainings, you are assigned a mentor and a small group to interact and connect with. We use Facebook groups for questions and answers, sharing of sequences, anatomy discoveries, heartfelt reflections, and so much more. We leverage visuals in order to teach complex subjects such as anatomy; you will get on-screen images of the muscles while you move in your physical body.

In short, the online platform offers an immense opportunity that you could never get in person.

MY #1 TIP

When searching for a 200 Hour training, I highly recommend getting to know the teacher first. Reading their blogs, practicing with them online or in-person if possible is incredibly helpful so you can know if you align with them or not. Find someone who inspires you and gets you excited to step into your potential! Try not to be distracted by exotic locations, or levels of fame, or quality of photos, etc. All of these aspects can be bonuses, of course, however, it is more important that you resonate with the teacher and what they have to offer. Your time is the most valuable thing you have, spend it with the people that help you rise up to who you want to be.

If you are looking to practice with me online, there is a free practice available to newsletter subscribers – scroll to the bottom of this page to receive it. That practice was recorded on my phone, so if you want a more professional practice with great sound and various camera angles, or if you want another powerful practice, I recommend trying out Dance with the Flames which uses the theme of stepping into the fire of transformation in order live the life you deserve. I sincerely hope you make use of the transformation equation and that it serves you for the many years to come! Please share your comments, questions, and experiences. I look forward to hearing from you.

upcoming 200 hour trainings

Are you ready to deepen your practice, build your confidence, and share the practice that you love? The 200 Hour Online training is an in-depth, highly educational experience that brings you through a step-by-step process of developing your yoga practice while providing you with teaching techniques that will not only certify you to teach but qualify on a professional level. This training will prepare you to walk into any room and teach with confidence and poise. You will also gain the tools of how to teach online yoga as well!

ONLINE LIVE CLASS IMMERSIONS

Expand your practice on and off the mat with Matt Giordano. With 3 Yoga Classes a week, you will learn the most effective techniques to develop strength, flexibility, balance, and body awareness. With unlimited lifetime access, you will have the choice to practice live or anytime at your convenience!

Continue Learning

Wake Up Your Wheel Pose

Wake Up Your Wheel Pose

Wake Up Your Wheel Poseheart openerWAKE UP YOUR WHEEL POSE We don’t have to question it—we know whether or not we’re feeling open, free, and strong in Wheel Pose. There’s a lightness and expansiveness that takes over when everything falls into place: From the initial...

read more
Spinal Spaciousness

Spinal Spaciousness

Spinal Spaciousnessdancer poseSPINAL SPACIOUSNESS Some key indicators of spinal health include strong bones, durable yet flexible ligaments, supple discs, and strong supportive muscles. Aside from nutrition, it’s not enough to say that movement in general is enough to...

read more
Steps To Scorpion Pose

Steps To Scorpion Pose

Steps to Scorpion PosevrschikasanaSCORPION POSE Exhilarating, stimulating, and enlivening are a few words we can use to describe Scorpion Pose. We can also use words such as grounding or even relaxing, which might initially be considered strange descriptors. When we...

read more
Heart Opening Education

Heart Opening Education

Heart-Opening EducationbackbendHEART-OPENING EDUCATION There is a great deal to learn with regard to heart-opening postures. Of course, negotiating the execution and being aware of the anatomy involved in various heart-opening poses are some of the initial...

read more
Pranayama

Pranayama

PranayamabreathworkPRANAYAMA Pranayama helps us to more deeply connect to the energy that runs through us. This can be done via a variety of breathwork practices. It’s important to understand that the breath is the physical layer through which we can access prana...

read more
Hip Opening Without Knee Pain

Hip Opening Without Knee Pain

Hip Opening Without Knee Painhip mobilityHIP OPENING WITHOUT KNEE PAIN "Hip opening” in a yoga class just sounds glorious if we feel confined or constricted in this area of the body and our intention is to transform this experience. The term may not sound glorious,...

read more

THE LIVE IMMERSION EXPERIENCE

Are you interested in developing your practice and taking it to the next level? Do you want to learn the techniques that maximize your potential in advancing your practice while minimizing the risk of injury? This immersion is for you. Take a deep dive into the heart of yoga in both body and mind. With 12 Live Yoga Practices, 4 Live Meditations, 2 Live group Zoom Calls, and a Facebook group to get all your questions answered, this immersion is sure to meet your expectations and go well beyond. Can’t practice at the live times? NO Problem, you get lifetime, anytime, anywhere access. After the class goes live, you will be able to tune in and watch as much as you would like!


FAQ’S

HOW DOES IT WORK?

When you sign up for the immersion, you will gain access to an exclusive members area of theyogimatt.com. When you are logged in, you will have access and be able to watch the live stream that day, and any previously aired live streams from that month.

ARE THERE RECURRING PAYMENTS?

NO. You are paying for access to one month of classes. After that, you will be provided a discounted rate should you want to continue practicing regularly. You will NOT be automatically billed. THIS IS A ONE TIME PAYMENT that gives you access to the classes in the respective month that you purchase.

WHAT IF I CAN'T MAKE THE LIVE TIME?

NO PROBLEM AT ALL! The Immersion consists of yogis worldwide in various time zones. This is why you have LIFETIME and UNLIMITED access. You can practice when it is convenient for you. You will receive emails throughout the week to keep you on track and keep you inspired to practice. There is a Facebook group where you will hear from other members, be able to ask questions, and stay connected. Both the emails from me and the group will keep you committed to your practice, even if you cannot practice live.

IS THIS TOO ADVANCED FOR ME?

Matt specializes in teaching ALL Levels yoga practices, providing modifications, and options throughout each class. These immersions are suitable for anyone with as little as 1-3 months of yoga practice or more. You do not need to have a regular practice, nor do you need to be flexible or strong. First-time yogis are welcomed so long as you have no major injuries.

WHAT STUDENTS SAY ABOUT THE LIVE IMMERISONS

Matt‘s classes are phenomenal. If you ever have the ability to practice with him, make use of it!! He has a very unique talent of combining anatomy, yoga philosophy, and his own perspective into a super intense package of knowledge that is fun AND easy to understand. I enjoyed the April immersion a lot as it was a great way of deepening my own practice and broadening my horizon, especially as the lifetime access allows you to take classes as often as you want- trust me, you will want to take them again! I can’t wait for next month’s classes and highly recommend everyone to take the May pass and joining in on the journey.

~Nadja Kyra King - @nadja_kyra

Matt’s April pass was a journey. It was more than just the physical exploration of my practice but also helped me explore my spiritual practice. It was very nice to have a consistent practice during this time of uncertainty. If you are looking for a practice to ground yourself I would highly recommend exploring the Live Immersion of the Month.
~Amanda Barnes Salowsky

Covid19 bought Matt into my home and my yoga practice. This last month I have learned so much. It has deepened my practice and my understanding of anatomy & biomechanics and how we use both in every asana we practice. He has also helped in my teaching, for example, asking my students to think about the foot as a tripod “big toe, pinkie toe, heel ” I never imagined I would learn so much from the immersion.
~Debbie, @the_joyofyoga

IMMERSION BEGINS IN

Day(s)

:

Hour(s)

:

Minute(s)

:

Second(s)

REGISTER NOW AND SAVE!

Reserve your spot, Be one of the first 50 students to sign up and you will save $200!

Are you ready to reconnect to your body, expand your practice, and feel better on a daily basis?


TOP RECOMMENDATIONS 

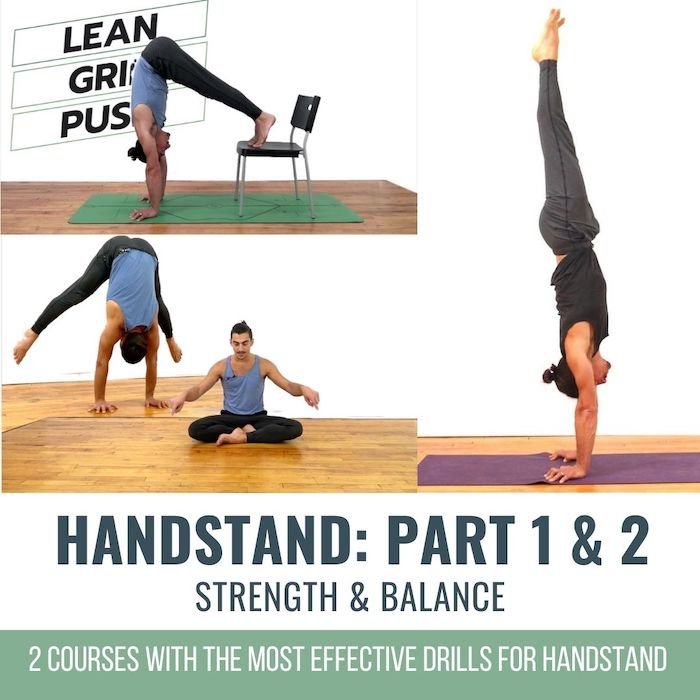
Handstand Training

Learn the techniques that make Handstand fun, easy and accessible! This 2 part course consists of the top most effective exercises will increase your strength and technique so you can easefully balance a handstand.

View Details

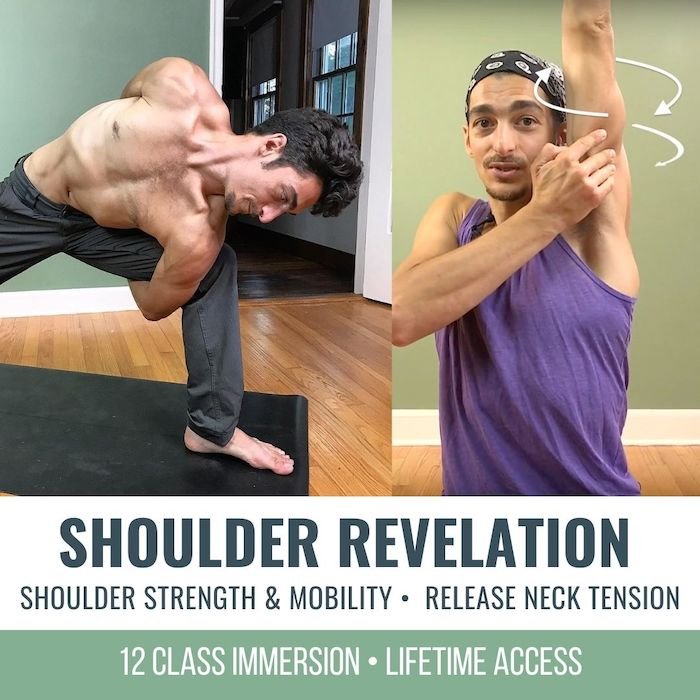
SHOULDER REVELATION

In this 12 class immersion  you will practice specific techniques to strengthen and unlock your shoulders. Each class focuses on a specific joint articulation and muscle group so you gain mastery in the shoulders.

View Details

HEART OPENERS

Finally, a 12 class immersion designed specifically to help you discover the freedom of heart openers. Learn how to avoid uncomfortable compression, and awaken your true range of motion in a step by step manner.

View Details

THE FREE TECHNIQUE PACK

When You Subscribe, You Will Get Instant Access to

  • the Technique Pack: 15 yoga pose breakdowns
  • exclusive online course discounts
  • exclusive blogs and videos
  • This field is for validation purposes and should be left unchanged.

Still Have Questions? Email Matt Directly

  • This field is for validation purposes and should be left unchanged.

The Transformation Equation

The Transformation Equation


A.C.T.

Deep inside every one of us there exists a desire to be the best we can be during this short time that we have here in this life. It may be covered up by insecurities, shame, guilt, or the business of our day-to-day. You owe it to yourself to live a life that feels amazing and has a positive impact on everyone around you. Reading this means you are already stepping in the right direction. Only those called toward a path of self-awareness would get excited enough at the word “transformation.” Most would be terrified of the word and back away entirely. Acknowledge your courage and continue seeking the tools that support your growth.

A.C.T. is the acronym I use for the Transformation Equation. It stands for Awareness + Conscious Action = Transformation. Before we go over what I mean by this, let’s first get clear on one thing. Transformation in the spiritual sense of the word is not the same as change. Change is inevitable, it’s happening all around us, within us, and it is unstoppable. Try to take control and stop change and you will always lose as it is a law of life. On the other hand, Transformation is a choice. While everyone longs to transform their lives and live at their highest potential, few are willing to risk the comforts of the known over the adventure of the unknown. Stepping into your potential is not without risk. You can try and calculate it but ultimately you have no idea what lies ahead. All you can control is what you do with the time that you have. Do you choose to face the challenges that are required for you to step up to your potential, or do you sit back living in the known stagnancy of day-to-day tasks?

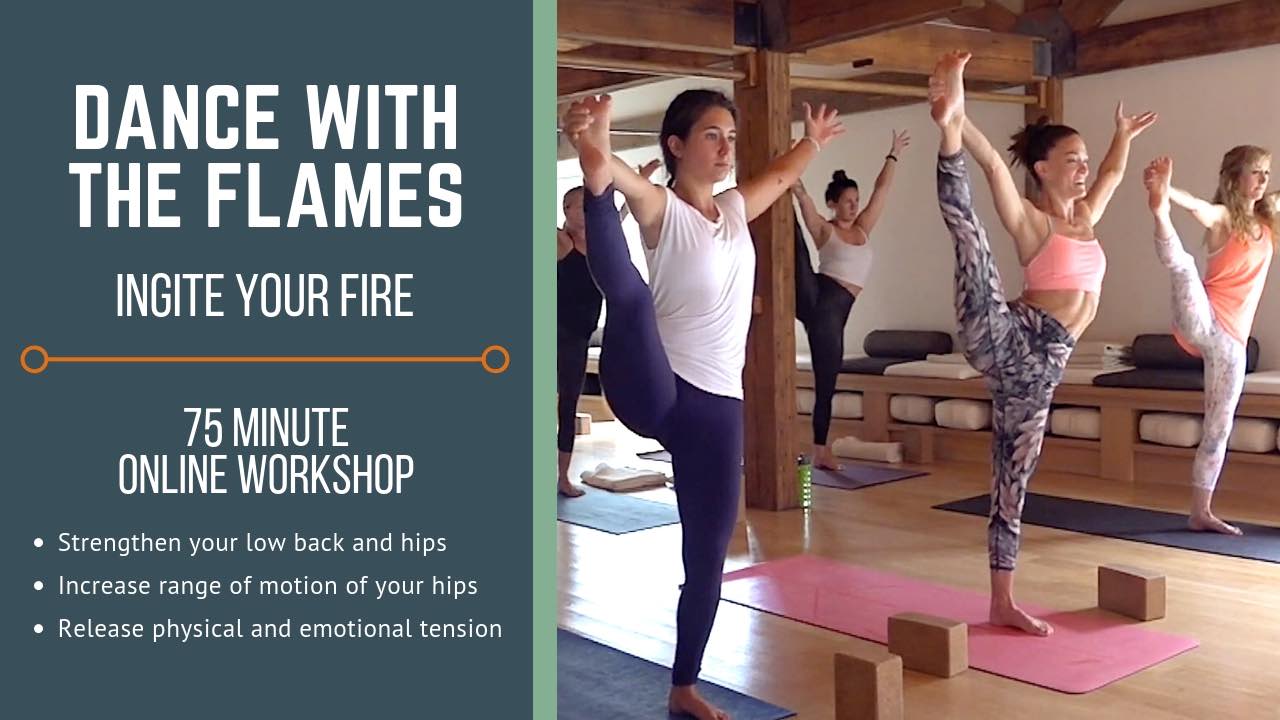
Dance With The Flames

Do you struggle with tight or weak hips, low back discomfort, or emotional stress? This workshop will provide you with a step-by-step approach to increase flexibility,  strength, and peace of mind. Evoke your inner fire and dance through life, the journey starts now!

AWARENESS + CONSCIOUS ACTION = TRANSFORMATION

    Step 1. Awareness

    Awareness is required before action if you want your efforts to produce positive outcomes. Action without awareness will still be productive but as we know, it often causes burn out and unfavorable results. Awareness can only be built through routine exercises of self-inquiry and observation. Self-inquiry is focused contemplation, asking yourself the questions to better understand your patterns of behavior. Most people are terrified of self-awareness simply because they don’t want to see all the aspects of themselves that they do not like. While it is true that you will see the darkness of who you are, you will also grow to see your amazing light that permeates every cell of your body. You cannot see your inner magnificence without cleaning off the lens that you see yourself through, which means you’ll have to be willing to see aspects of yourself that you are not proud of. No matter how much we each deny it, we all want to be the best we can be, and that requires facing our internal challenges, cleaning our lens of perception, and inquiring about who we are and why. Self-inquiry takes tremendous courage but as a result, we become self-aware, grateful for the person that we are, relaxed in our being, confident, filled with love to give, able to receive, more productive, less burnt out, more joyful, and so on.

    Step 2: Conscious action

    Action in alignment with awareness leads to profound results. Conscious Action requires awareness in every step, re-evaluation, and clear communication with anyone you are carrying out the actions with. Awareness produces a clarity inside of who you are and what you want to create with the time you have in this body. However, without Conscious Action, you can never grow into your potential. Potential is a trajectory, a path that you walk not a destination. Your potential could simply be to become a kind-hearted, loving human being, or it might be bigger than that: to become one who pulls others around them into their potential. Your potential will always grow as you take steps toward it – stay in tune through self-inquiry, and Consciously take action in alignment with it.

    Result: Transformation

    Transformation is the inevitable result of your awareness and actions. The choice to transform your current life for the person you are becoming is one that very few people take in this life. Transformation can not happen without Awareness because without seeing your own magnificence you can never expand upon it. If all you see is your self-doubt and insecurities, and you spend your energy hiding them from the majority of people you connect with, you will never have the energy to move forward. Do you choose to hide or do you choose to get courageous, see and share yourself, and expand into the person you are becoming? Watch the video below to see more about how to make use of the transformation equation and build the courage to step into your magnificence potential. You deserve it. 

    Create a Life You Love

    Place your energy on what you want to create in your life so that the short life that you get to live is filled with love! If you are looking to go deeper, I taught and recorded a workshop live called Dance with the Flames which uses the theme of stepping into the fire of transformation in order to live the life you deserve. I sincerely hope you make use of the transformation equation and that it serves you for the many years to come! Please share your comments, questions, and experiences. I look forward to hearing from you.

    DANCE WITH THE FLAMES

    A rare and exciting experience that will take you through an incredible adventure in both body and mind.  If you are looking to step into the fire of transformation so you can joyfully dance with the flames, this is the perfect workshop. It was filmed live to bring you the fullness of energy!

    Continue Learning

    Wake Up Your Wheel Pose

    Wake Up Your Wheel Pose

    Wake Up Your Wheel Poseheart openerWAKE UP YOUR WHEEL POSE We don’t have to question it—we know whether or not we’re feeling open, free, and strong in Wheel Pose. There’s a lightness and expansiveness that takes over when everything falls into place: From the initial...

    read more
    Spinal Spaciousness

    Spinal Spaciousness

    Spinal Spaciousnessdancer poseSPINAL SPACIOUSNESS Some key indicators of spinal health include strong bones, durable yet flexible ligaments, supple discs, and strong supportive muscles. Aside from nutrition, it’s not enough to say that movement in general is enough to...

    read more
    Steps To Scorpion Pose

    Steps To Scorpion Pose

    Steps to Scorpion PosevrschikasanaSCORPION POSE Exhilarating, stimulating, and enlivening are a few words we can use to describe Scorpion Pose. We can also use words such as grounding or even relaxing, which might initially be considered strange descriptors. When we...

    read more
    Heart Opening Education

    Heart Opening Education

    Heart-Opening EducationbackbendHEART-OPENING EDUCATION There is a great deal to learn with regard to heart-opening postures. Of course, negotiating the execution and being aware of the anatomy involved in various heart-opening poses are some of the initial...

    read more
    Pranayama

    Pranayama

    PranayamabreathworkPRANAYAMA Pranayama helps us to more deeply connect to the energy that runs through us. This can be done via a variety of breathwork practices. It’s important to understand that the breath is the physical layer through which we can access prana...

    read more
    Hip Opening Without Knee Pain

    Hip Opening Without Knee Pain

    Hip Opening Without Knee Painhip mobilityHIP OPENING WITHOUT KNEE PAIN "Hip opening” in a yoga class just sounds glorious if we feel confined or constricted in this area of the body and our intention is to transform this experience. The term may not sound glorious,...

    read more

    TOP RECOMMENDATIONS 

    Handstand Training

    Learn the techniques that make Handstand fun, easy and accessible! This 2 part course consists of the top most effective exercises will increase your strength and technique so you can easefully balance a handstand.

    View Details

    SHOULDER REVELATION

    In this 12 class immersion  you will practice specific techniques to strengthen and unlock your shoulders. Each class focuses on a specific joint articulation and muscle group so you gain mastery in the shoulders.

    View Details

    HEART OPENERS

    Finally, a 12 class immersion designed specifically to help you discover the freedom of heart openers. Learn how to avoid uncomfortable compression, and awaken your true range of motion in a step by step manner.

    View Details

    THE FREE TECHNIQUE PACK

    When You Subscribe, You Will Get Instant Access to

    • the Technique Pack: 15 yoga pose breakdowns
    • exclusive online course discounts
    • exclusive blogs and videos
    • This field is for validation purposes and should be left unchanged.

    Still Have Questions? Email Matt Directly

    • This field is for validation purposes and should be left unchanged.

    UNLOCK YOUR HIPS

    UNLOCK YOUR HIPS

     OUTER HIP STRENGTH AND FLEXIBILITY FOR THE LOW BACK AND S.I. JOINT


    THE LOW BACK AND S.I. JOINT

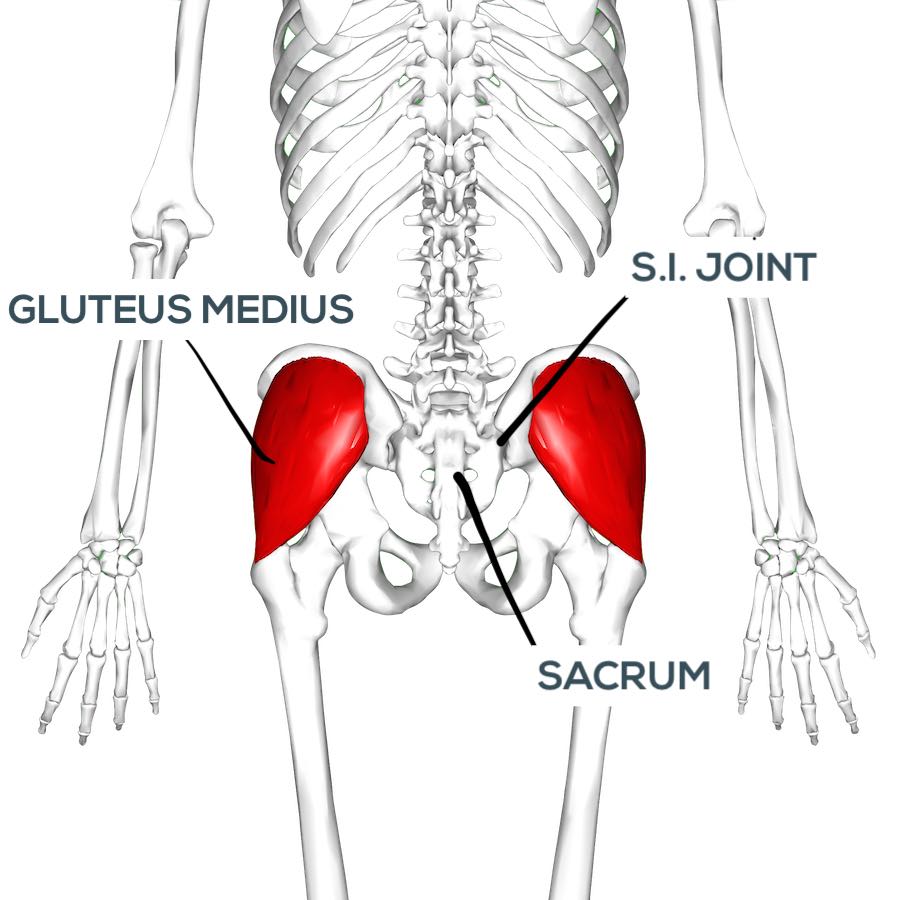
    Low back pain or S.I. Joint instability are quite common for many people and the cause seems to be a mystery. What most people don’t realize is that pain is usually the result of weak or underdeveloped muscles resulting in the overcompensation by other muscles. In other words, the body develops patterns that are perhaps not the best when it comes to our well-being. Why does it develop patterns? All of nature adapts to the environment. As beings of nature, we do exactly the same thing – the body adapts to what we give it. If we give it a shape and hold that shape for the majority of the day then it will develop patterns of elongated muscles and shortened muscles. Some of the muscles that tend to cause problems for the low back that are often overlooked are the ABDUCTORS of the Hips. 3 of the muscles that make up the abductors are the Gluteus medius, Gluteus Minimus and T.F.L. You can see in the photo to the right (or below if you’re on mobile) that the gluteus medius attaches to each side of the pelvis and to the top of the thigh bone. 

    LOW BACK PAIN

    The two sides of the pelvis are actually independently mobile structures due to the sacrum that lies in the middle which has a joint on either side that is called the S.I. Joint. This joint allows the pelvis on each side to move. This is a blessing but could also be a curse if the abductor muscles are out of balance. If one side is tight and the other flexible this could cause the pelvis to tilt, potentially resulting in low back discomfort or scoliosis. This was the case for me.

    Growing up, I played hockey which strengthens the abductors. Unfortunately, I favored my right leg significantly which caused an over development and shortening of the musculature on the right side resulting in scoliosis and back pain throughout high school and college until about a year into yoga when I finally learned how to unlock my hips!

    S.I JOINT

    Now for other people, the low back isn’t affected but the S.I. Joint is. This seems to be most common amongst women, especially those that have had children – the ligaments tend to be more lax and so the sacrum can move inside the two sides of the pelvis resulting in pain on the back of the pelvis or radiating through the lower back near the pelvis and sacrum.

    THE SOLUTION

    There are many muscles that surround the pelvis that can pull on either side of the ilium or sacrum which could create pain, so where do we begin? Often times it can be overwhelming and ineffective to target all the hip and back muscles every yoga practice, so it is useful to focus on one area per practice. In the video below I share with you ways of working on the Abductor group for strength and range of motion. You may find that one side is not as strong as the other – if this is the case I recommend strengthening the weaker side which will help bring the abductors into balance.

    I do have a workshop called Hips: Rock and Unlock Em that I created as a way to target as many of these muscles within one practice. You could start there to get a feel for what areas of your hips are underdeveloped or out of balance.

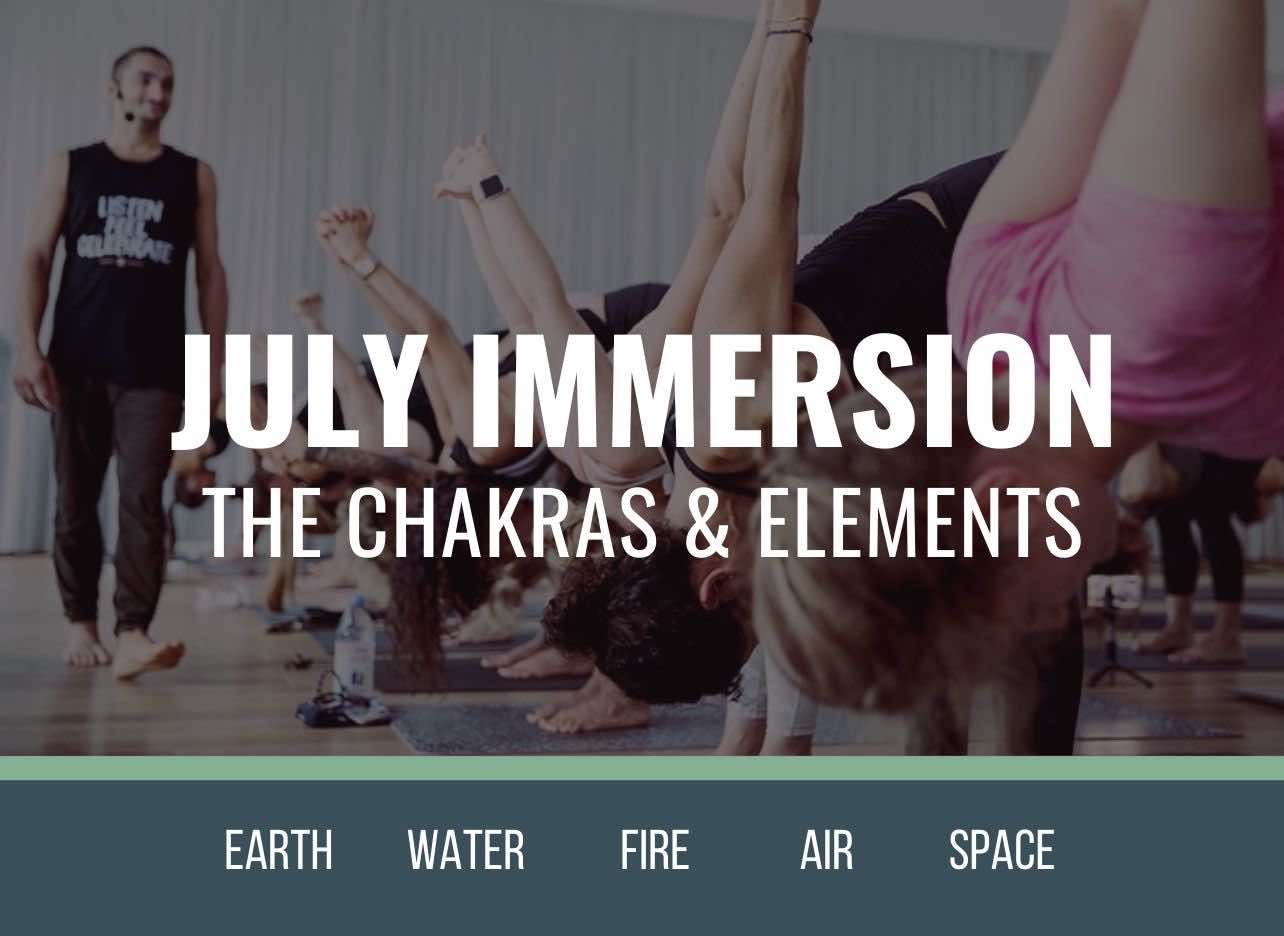
    In addition, I highly recommend the JULY IMMERSION which focuses on the Chakras. The first 5 practices of that immersion will awaken your strength, flexibility and awareness of the muscles that surround the hips.

    OPEN YOUR HIPS AND HEART

    The July Immersion takes you on a 12 Class Journey through the Chakras and the elements, to develop your strength, flexibility, and awareness of each energy center and the corresponding muscles. There is a heavy focus on the Hips in the Earth, & Water classes, and the Back in the Water and Air classes, balanced by Core strengthening in the Fire section.

    THE STEP BY STEP APPROACH

    “Dream big, start small, then connect the dots.” This quote from Dan Millman’s Wisdom of the Peaceful Warrior has been the foundation of my yoga practice from the moment I stepped on the yoga mat. It was that book that led my to yoga in the first place, and that line that became a mantra in my head from that moment on. How does it apply to the asana practice? Most people come into the yoga practice and feel something magnificent and of course they want to come back. At some point, regardless of how egoless we believe ourselves to be, we become attracted to the external postures of the yoga practice. It’s typically innocent of course, we associate a feeling with certain postures, on a subtle level we believe that when we attain them we will feel strong, powerful, fearless, light, free, at peace, worthy of love, kindness, etc. On an intellectual level, we usually know that this is not reality but we get pulled into it anyway. The beautiful thing is that we are being pulled into practice and the practice reveals what we need to learn. So I wouldn’t ridicule this process, but rather as you walk the path remind yourself that everything you wish to feel already exists within you, and rather than expecting yoga to do the practice for you, step into the feeling you crave and let that amplify your practice. This is what it means to practice with intention.  

    All that being said while we are living in this body we want to take care of it and allow it to reach its highest potential which includes movement practices, stability practices, diet, hygiene, mental health, creative expression, and so on. When I say highest potential, I don’t mean an end result or destination but rather a trajectory that gets us to walk the path. The purpose of this blog is to support your physical well-being in regard to your body. Asana is the practice that cultivates our body awareness, but most of us focus on the postures instead of our body and as a result we are left with thousands of shapes and alignment cues. A shortcut to body awareness is to put your body first, and the pose second! What does that mean? There are only a few major joints to learn in the body, and each has a few movements available to it. There are muscles that surround each joint that create this movement. If you use your asana practice to become aware, proficient, or even masterful in each movement then you will no longer be perplexed when you see a new pose, you will know exactly what is needed to put your body in that shape. You will grow to understand your limitations and your abilities, becoming your own best teacher.  

    THE CHROMATIC SYSTEM 

    I created Chromatic Yoga based on this concept of small steps toward our potential. Each month we have a focus in our classes, a Physical Through-Line (PTL), and a Thematic Through-Line (TTL).  The PTL is the one muscle group or joint action that we pull through an entire class, or workshop, while the TTL is similar but for building awareness of the mind and subtle energies of life. Because I encourage Chromatic Teachers to be authentic with how they teach, each will have their own way of creatively sharing the PTL and TTL. This month PTL – Abductors of the hip, is the focus of the video below. These are just a few ways to strengthen and become aware of the muscles.

    To find a Chromatic Yoga Teacher near you be sure to visit us at www.ChromaticYoga.com 

    3 Steps to Master the Abductors

    1. Awareness: learn the sensation of activating the abductors
    2. Strengthen: the muscle group through various postures in your yoga practice.
    3. Practice: activate the abductors over the course of time, through as many yoga postures as possible until you can easily activate them on command in any posture!

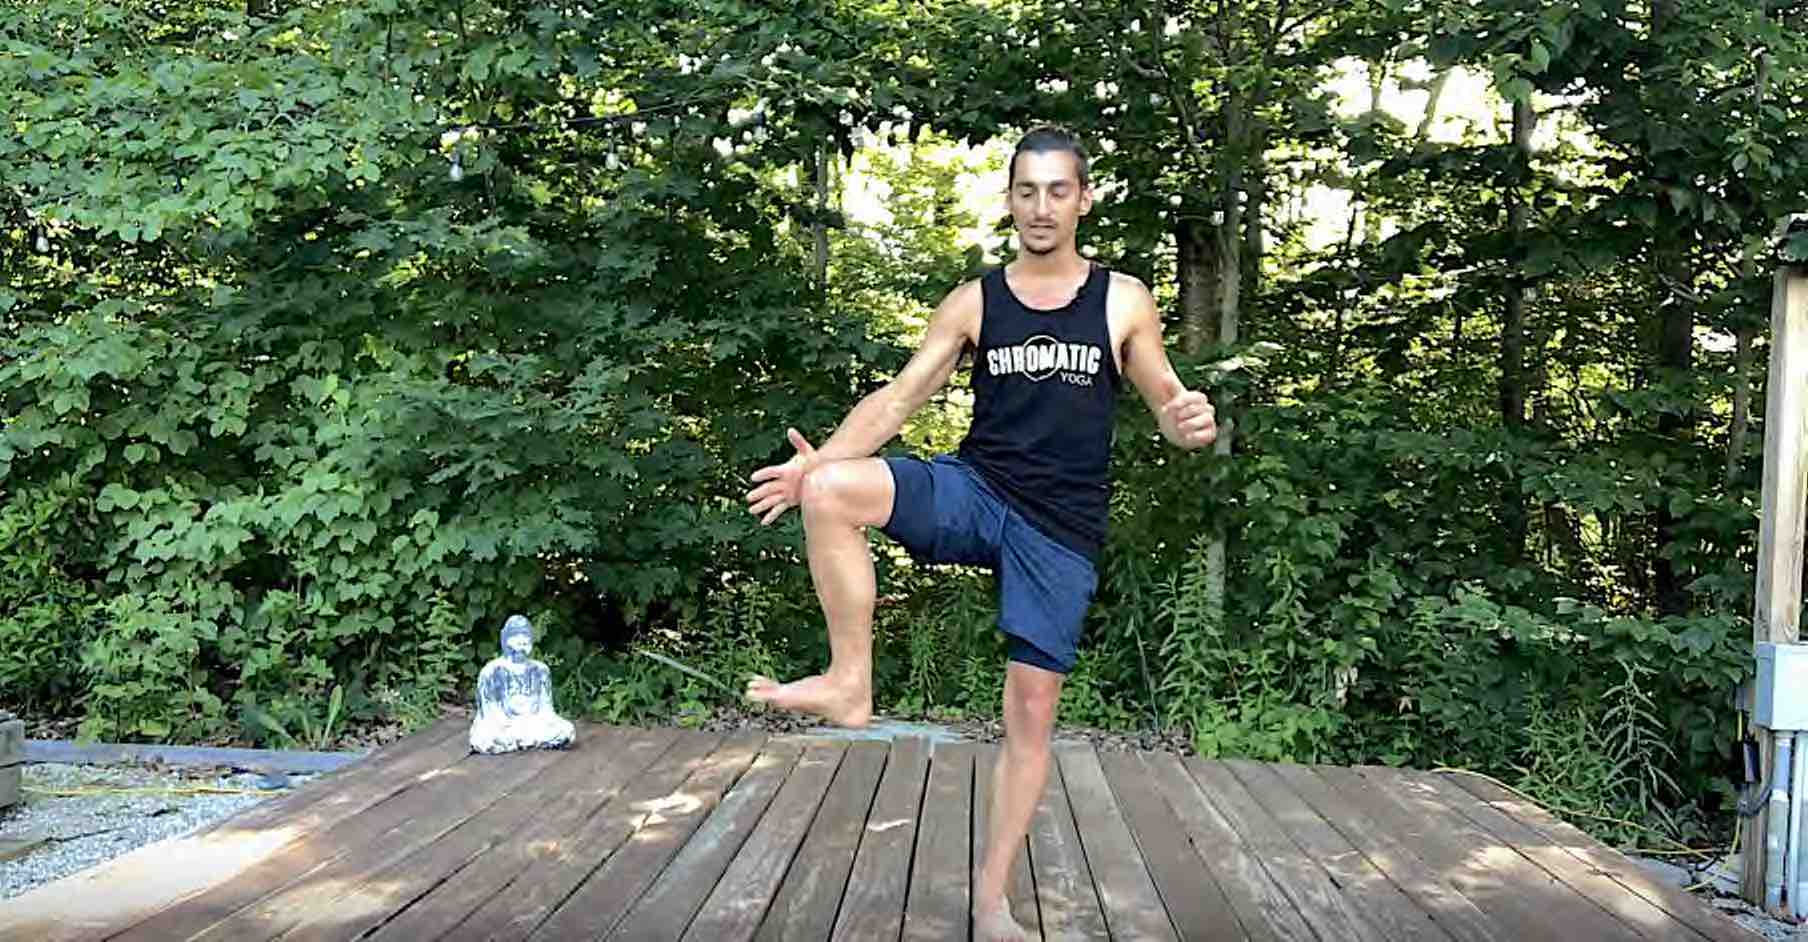
    Step 1. Awareness

    The first step to building awareness of any muscle is to intellectually understand where it exists in the body. The abductor group is generally located in the outer hip/pelvic region. In addition to the intellectual understanding, you must learn what it feels like to activate this muscle. For this, it’s typically easiest to “create a boundary” and press into it. So here I have placed a hand outside the knee and I press into the hand which creates the action of abduction and engages the abductors.

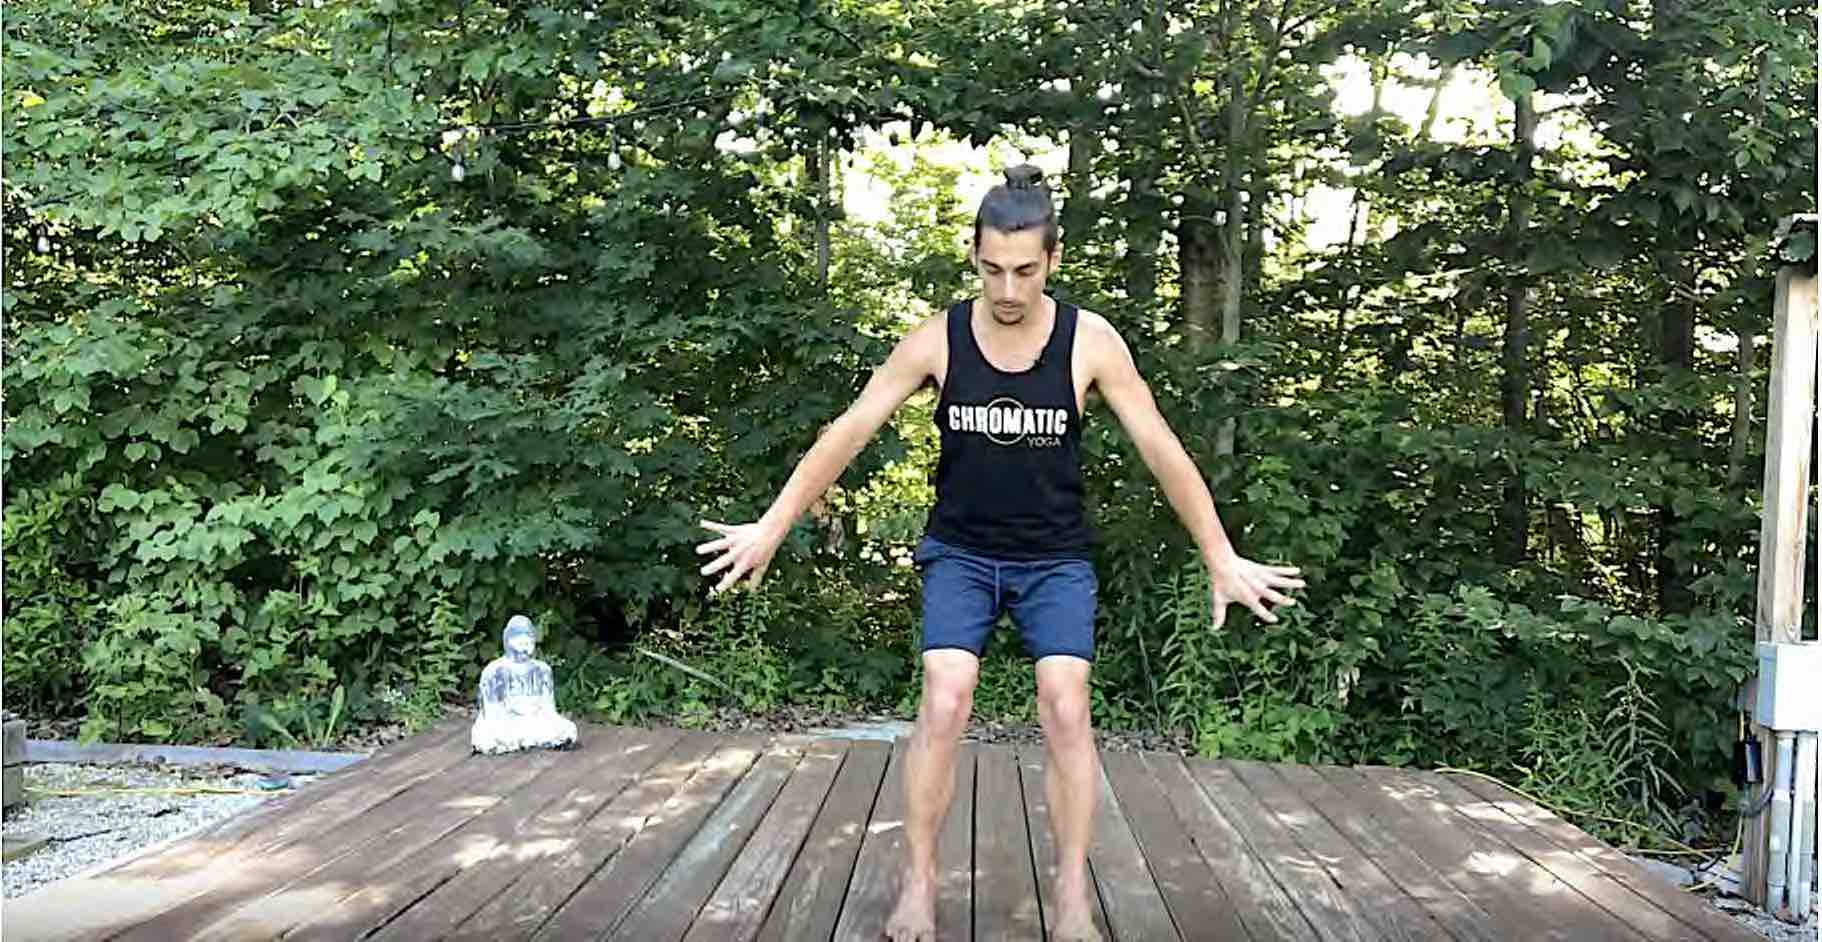
    Step 2: strengthen

    Next, you will want to develop strength in accessible postures. Typically choosing static postures for “isometric” engagement is a safe and stable way to strength. Isometric means activate the muscle without movement of the joints. For this video, I chose Chair pose to share with you. With feet about hip-width apart, push your yoga mat apart with your heels while keeping your knees pointing straight forward. Note: if your pelvis is tucked under you may not be able to access the abductors, stick your buttocks upward.

    Step 3: Practice

    Lastly, you will need to learn how to activate this muscle group through a range of motion. This means not only choosing a wide range of static yoga postures to activate the abductors in, but you will also want to do the movements that it creates. For this, I chose fire hydrant pose, both abducting the upper hip by lifting the leg up high, and the lower hip by squeezing the pelvis inward. Because the foot is on the ground, moving and rotating the pelvis away from the foot is abduction. You will feel it in your outer hip muscles.

    Mastery Leads to Discernment

    Why become masterful at anything? Mastery is not an end goal, it is simply a state of heightened awareness and capability. To become masterful in your physical body is not a chore but rather a privilege. Getting to know this vehicle that we have for only a short period of time is a form of respect and love. There is no end to mastery, just like there is no end to potential, it’s simply a trajectory or path that we walk out of respect to the greater energy that pulses through us. Mastery simply means that we can assess what is appropriate for the well-being of our body at any given time, and we have the tools to do what’s necessary to feel better. While we will always have blind spots, we can minimize the vast amount of guesswork by taking the step-by-step approach to understanding our body – one muscle group or joint action at a time.

    To apply this approach to the body,  I recommend practicing The July Immersion – 12 Yoga Classes, 4 Guided Meditations – and Hips: Rock and Unlock ‘Em!  The online workshop is a journey through what I call the 4 quadrants of the hips, supporting you on the path toward mastery of the inner thighs, outer hips, posterior chain, and hip flexors.

    Hips: Rock & Unlock 'Em

    Get 2 full hours with Matt Giordano focusing on the techniques that increase the range of motion in your hips and provide long-lasting freedom. You will have immediate, unlimited access, and can enjoy the benefits today!

    LIVESTREAM PACKAGES

    boundless freedom

    • 12 YOGA CLASSES
    • SHOULDER BIOMECHANICS
    • TANTRIK YOGA TEACHINGS
    • 4 POST CLASS MEDITATIONS
    • 12 PEAK POSTURES
    • SALE Price:$98 

    BIRDS OF PARADISE

    • 12 YOGA CLASSES
    • 4 GUIDED MEDITATIONS
    • LIVETIME ACCCESS TO ALL
    • 12 PEAK POSTURES
    • 12 YOGA SUTRA THEMES
    • SALE Price:$98

    BEST STARTER PACKAGE

    • 6 YOGA CLASSES
    • 2 GUIDED MEDITATIONS
    • LIVETIME ACCCESS TO ALL
    • 6 PEAK POSTURES
    • 6 YOGA SUTRA THEMES
    • SALE Price:$78

    JOURNEY TO BLISS

    • 12 YOGA CLASSES
    • 4 GUIDED MEDITATIONS
    • LIVETIME ACCCESS TO ALL
    • 12 PEAK POSTURES
    • 12 YOGA SUTRA THEMES
    • SALE Price:$98

    KING PIGEON & HANUMAN

    • 12 YOGA CLASSES
    • 4 GUIDED MEDITATIONS
    • LIVETIME ACCCESS TO ALL
    • 12 PEAK POSTURES
    • 12 YOGA SUTRA THEMES
    • SALE Price:$98

    JOURNEY TO THE HEART

    • 12 YOGA CLASSES
    • 4 GUIDED MEDITATIONS
    • LIVETIME ACCCESS TO ALL
    • 12 PEAK POSTURES
    • 12 YOGA SUTRA THEMES
    • SALE Price:$128

    BACK, NECK & SHOULDERS

    • 12 YOGA CLASSES
    • 4 GUIDED MEDITATIONS
    • LIVETIME ACCCESS TO ALL
    • 12 PEAK POSTURES
    • 12 YOGA SUTRA THEMES
    • SALE Price:$128

    Continue Learning

    Wake Up Your Wheel Pose

    Wake Up Your Wheel Pose

    Wake Up Your Wheel Poseheart openerWAKE UP YOUR WHEEL POSE We don’t have to question it—we know whether or not we’re feeling open, free, and strong in Wheel Pose. There’s a lightness and expansiveness that takes over when everything falls into place: From the initial...

    read more
    Spinal Spaciousness

    Spinal Spaciousness

    Spinal Spaciousnessdancer poseSPINAL SPACIOUSNESS Some key indicators of spinal health include strong bones, durable yet flexible ligaments, supple discs, and strong supportive muscles. Aside from nutrition, it’s not enough to say that movement in general is enough to...

    read more
    Steps To Scorpion Pose

    Steps To Scorpion Pose

    Steps to Scorpion PosevrschikasanaSCORPION POSE Exhilarating, stimulating, and enlivening are a few words we can use to describe Scorpion Pose. We can also use words such as grounding or even relaxing, which might initially be considered strange descriptors. When we...

    read more
    Heart Opening Education

    Heart Opening Education

    Heart-Opening EducationbackbendHEART-OPENING EDUCATION There is a great deal to learn with regard to heart-opening postures. Of course, negotiating the execution and being aware of the anatomy involved in various heart-opening poses are some of the initial...

    read more
    Pranayama

    Pranayama

    PranayamabreathworkPRANAYAMA Pranayama helps us to more deeply connect to the energy that runs through us. This can be done via a variety of breathwork practices. It’s important to understand that the breath is the physical layer through which we can access prana...

    read more
    Hip Opening Without Knee Pain

    Hip Opening Without Knee Pain

    Hip Opening Without Knee Painhip mobilityHIP OPENING WITHOUT KNEE PAIN "Hip opening” in a yoga class just sounds glorious if we feel confined or constricted in this area of the body and our intention is to transform this experience. The term may not sound glorious,...

    read more

    TOP RECOMMENDATIONS 

    Handstand Training

    Learn the techniques that make Handstand fun, easy and accessible! This 2 part course consists of the top most effective exercises will increase your strength and technique so you can easefully balance a handstand.

    View Details

    SHOULDER REVELATION

    In this 12 class immersion  you will practice specific techniques to strengthen and unlock your shoulders. Each class focuses on a specific joint articulation and muscle group so you gain mastery in the shoulders.

    View Details

    HEART OPENERS

    Finally, a 12 class immersion designed specifically to help you discover the freedom of heart openers. Learn how to avoid uncomfortable compression, and awaken your true range of motion in a step by step manner.

    View Details

    THE FREE TECHNIQUE PACK

    When You Subscribe, You Will Get Instant Access to

    • the Technique Pack: 15 yoga pose breakdowns
    • exclusive online course discounts
    • exclusive blogs and videos
    • This field is for validation purposes and should be left unchanged.

    Still Have Questions? Email Matt Directly

    • This field is for validation purposes and should be left unchanged.

    Lifting The Arches of Your Feet

    Are Your Arches Lifted?

    Setting the foundation for standing postures - Avoid Collapsed Arches

    Is your foundation trong?

    Setting the foundation of any posture is arguably the most important step you can take aside from breathing of course, which you can simply consider a part of the foundation. You probably have heard me talk about the foundation of arm balances and handstands a million times, but how about standing postures? If you have practiced with me on retreat or at the Elements of Mastery, you already know the importance of what I am about to share with you. If you have not worked with me before, no problem, I am going to take you through a step-by-step approach to building a strong, solid foundation for all your standing postures.

    Have you been asked to lift the arches of your foot in a class? Did you know how to do that on your own? Maybe you were told to lift your toes in order to do so, and you probably noticed a loss of connection to stability. Lifting your toes can be a great way to strengthen some of the muscles I am about to share with you, but it is literally just the beginning.

    Does it really matter?

    This is a great question and I wouldn’t blame you for asking because ultimately knowing the why behind anything we do gives our actions power. So why lift the arches? Consider your feet the foundation of all standing postures. Would you build your extremely expensive one-of-a-kind house on mud, or would you prefer a solid foundation you know will hold up over time? Picture it, a strong, heavy house resting on a muddy foundation, eventually part of the house would start to sink downward while other parts remained strong. The pressure would build and the weakest parts would start to break. This happens in our body, and the weakest points are typically our joints. The joints are weak because they are the place where two or more bones come together for the purpose of movement. If they were too strong, no movement would be available. Gravity is always upon us and pulling us downward. When our bones are properly aligned there is less stress on the joints. However, what if we have an imbalance at the ankle that causes our weight to fall to the inside or outside of the foot? Not only is the ankle or foot at risk but ALL of the joints that exist above it are too because they have to compensate for the new alignment. This is why you could have a pain in your neck that stems from weakness and miss-alignment at the ankle. You feel it in the neck because the neck is compensating for everything below it. This is very important to understand especially if you are a yoga teacher or in any field of physical health. Does it matter…? YES!

    The Anatomy

    For the purposes of this article, we will talk about two joint actions and the muscle groups that create them: Eversion and Pronation of the ankle which occurs at the subtalar joint. The subtalar joint is just below the ankle joint. The ankle joint allows for the up and down movements of plantar flexion (pointing the foot) and dorsiflexion (flexing the foot), while the subtalar joint allows the foot to rock from side to side. For the purpose of simplicity, we will refer to both of these joints as a collective –  “the ankle”.

    The arch of the foot

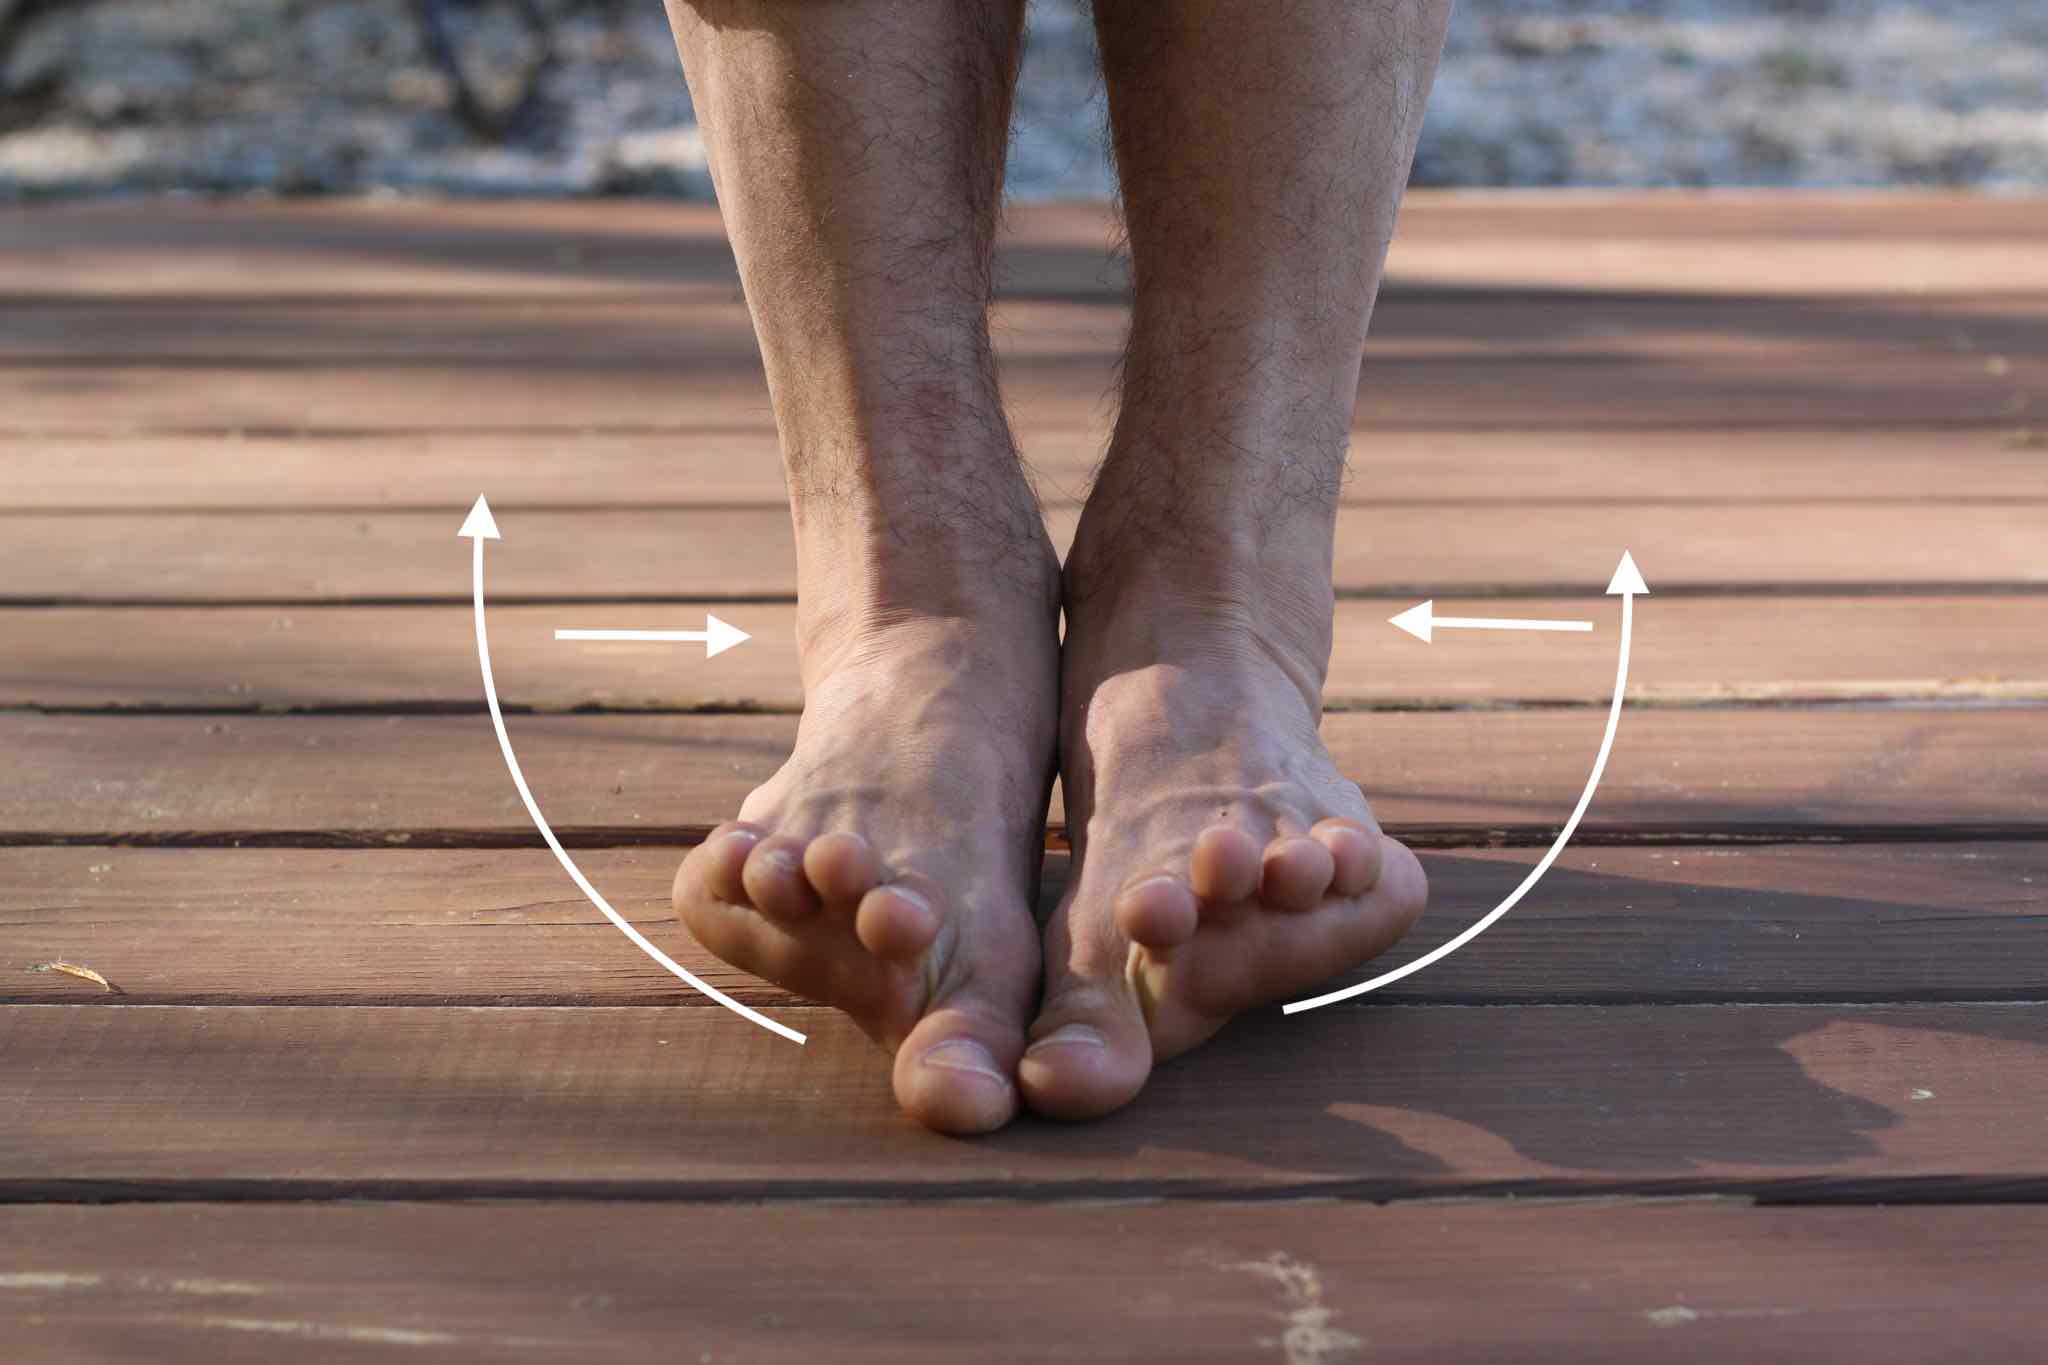
    There are multiple muscles that help to form the arch of the foot. How high someone’s arches are may be due to the structure of the foot – the bones might be shaped in a more flattened position. However, we aren’t concerned with the external look of an arched foot but rather, training the muscles to activate appropriately for our feet. Most of us can use strengthening of these muscles. The way that I found really helps is first learning how to isometrically engage the muscles of inversion and eversion at the same time which forms a “bootstrap” like scenario around the foot. One of the fibula muscles wraps from the outer shin down the outer ankle and attaches near the ball mound of the big toe – That is pretty cool! There are muscles underneath the sole of the foot that when activated in conjunction with the muscles of inversion and eversion allow us to find greater engagement and lift of our arches.

    One of the best ways to integrate these actions in your practice is to repeat them throughout your yoga practices. If you are interested in greater balance, stability, and ankle awareness there are two online immersions – 12 class packages that focus heavily on the feet and ankles.

    1. The July 2020 Immersion titled The Chakras & the Elements – the Earth and Water practices will provide a profound awakening to the ankles and feet and how they relate to your practice.

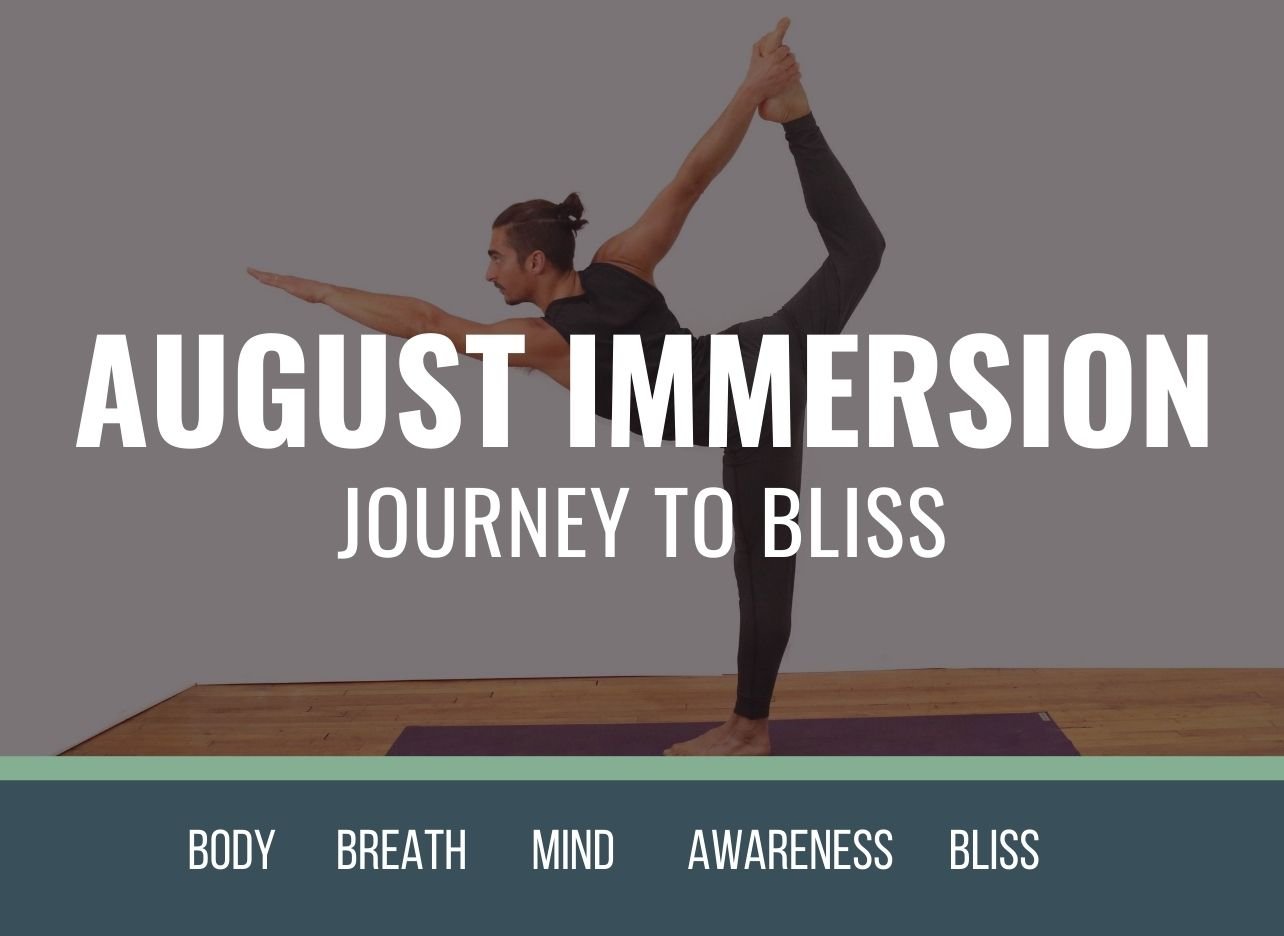
    2. The August 2020 Immersion titled Journey To Bliss follows a similar format as of July; the first few practices target the ankles and feet. I highly recommended either or both of these immersions.

    Everting

    ankle strength, heal sprained ankle with yoga

    Inverting

    ankle strengthening for yoga
    October Livestream Yoga Classes

    CHAKRAS AND ELEMENTS

    FULL BODY AWAKENING

    • Unlock Your Hips!
    • Awakem Your Arm Balance Practice
    • Detailed Ankle and Feet Articulation
    • Develop Low Back and Buttock Strength
    • Strengthen Your Core
    • Release S.I. Joint Pain
    • Release Neck Pain
    • The July Immersion Has it ALL
    • Each Chakra & Element is Paired with an Area of the Body and Muscle Group
    • 12 All Levels Live Asana Classes
    • 4 Live Guided Meditations


    3 Steps To Activate the Core of the Foot

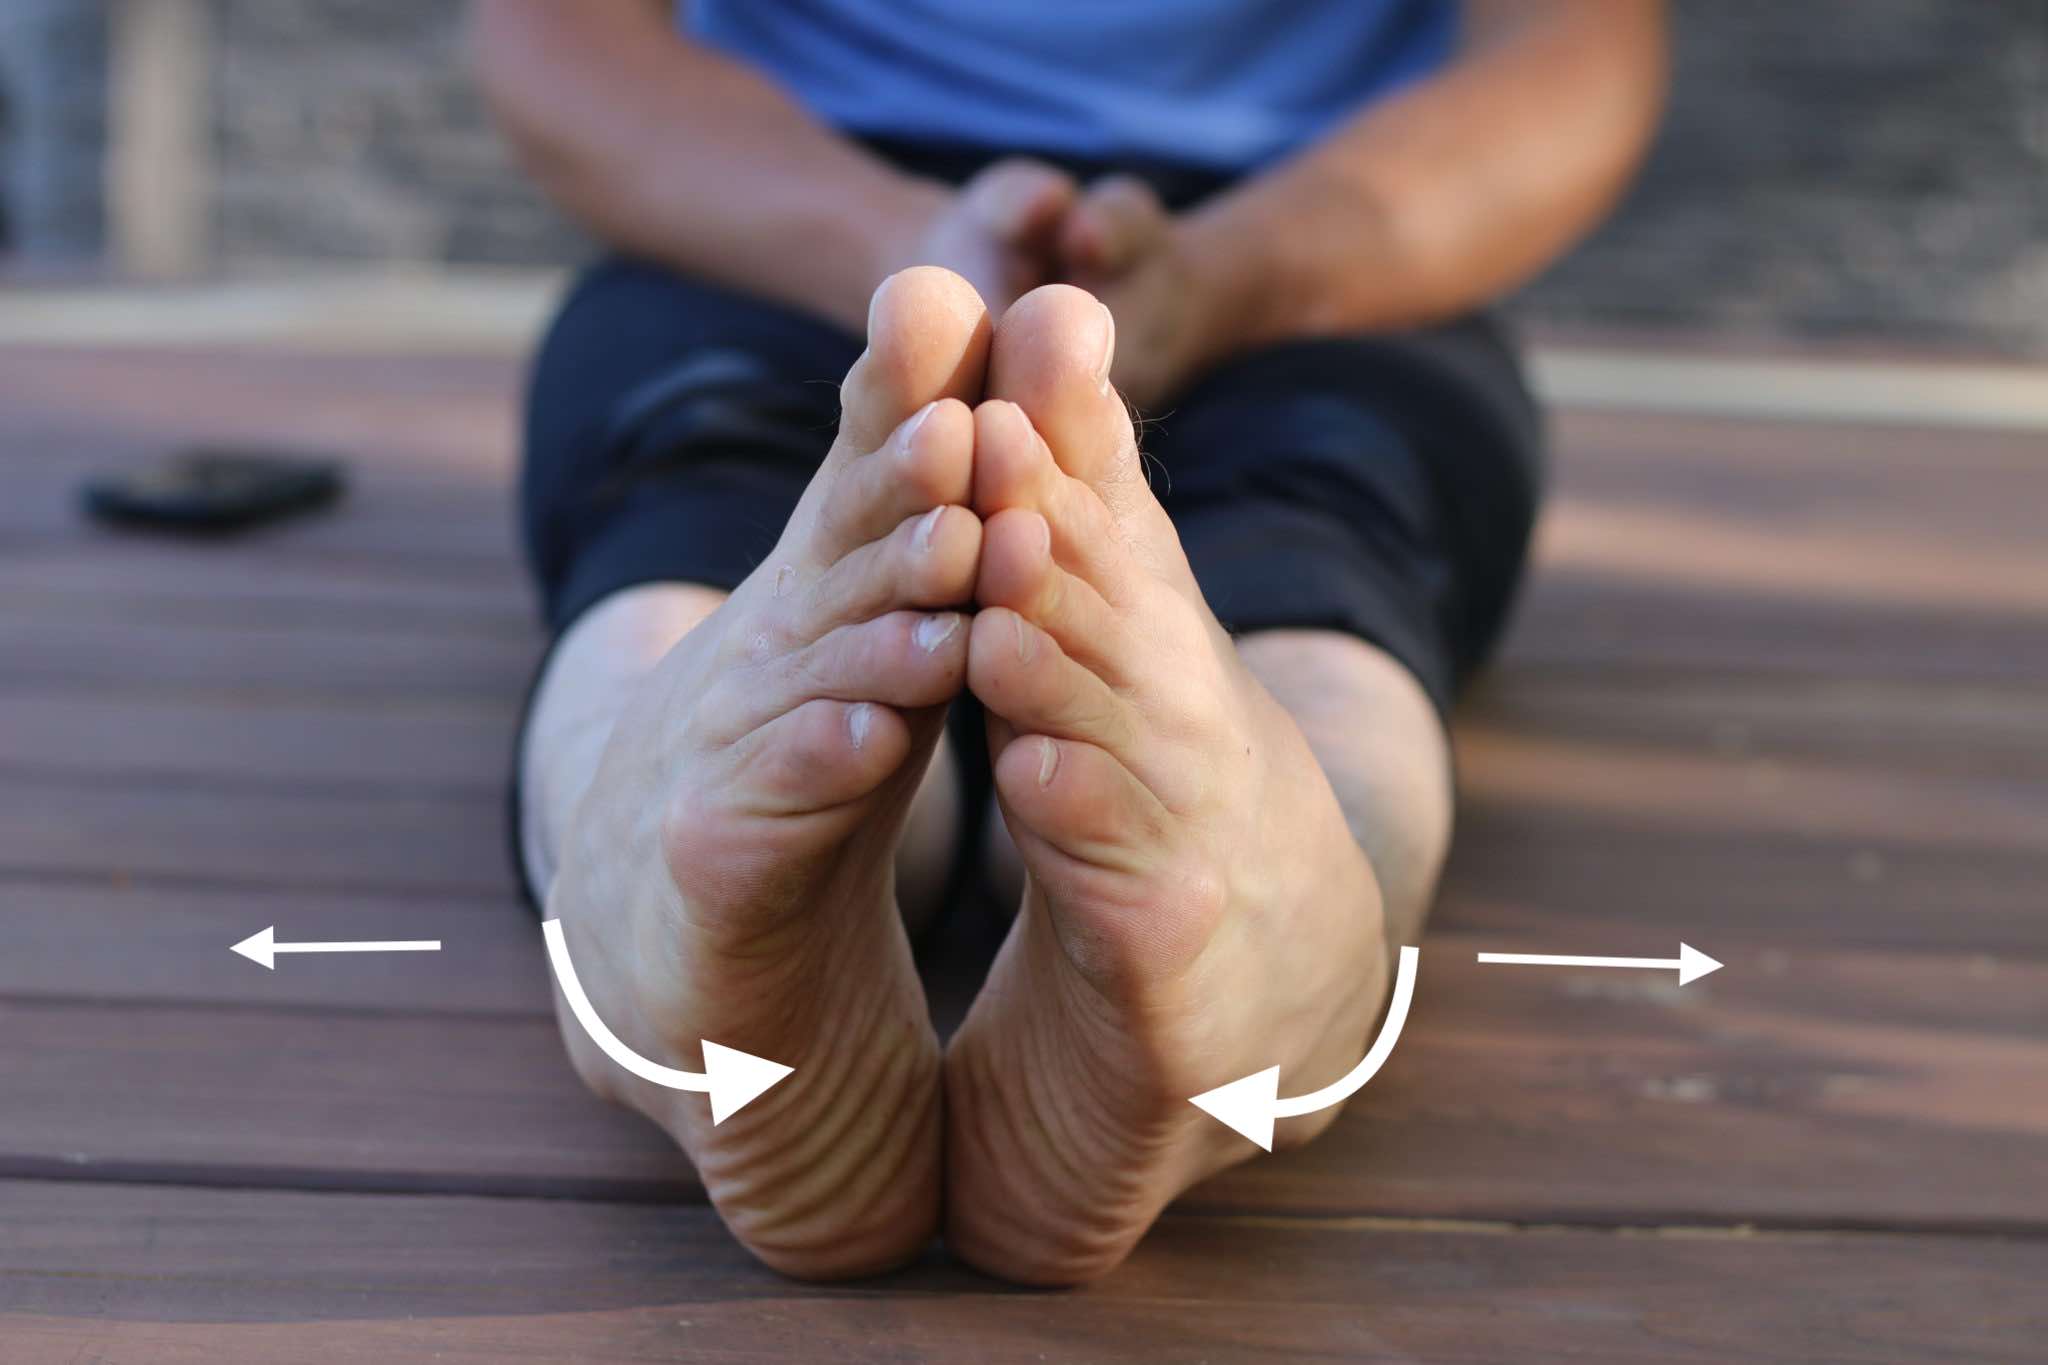
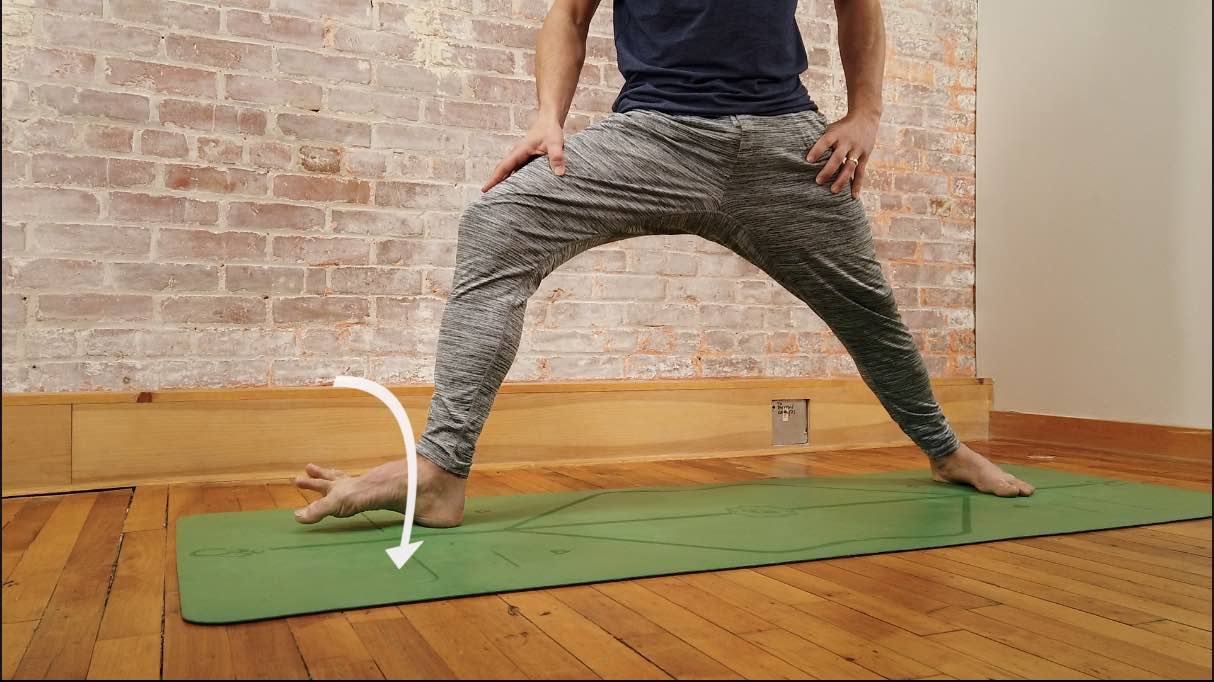
    1. Press the outer edge of the food down.
    2. Maintain this action, and counter engage by pressing the big ball mounted and big toes down.
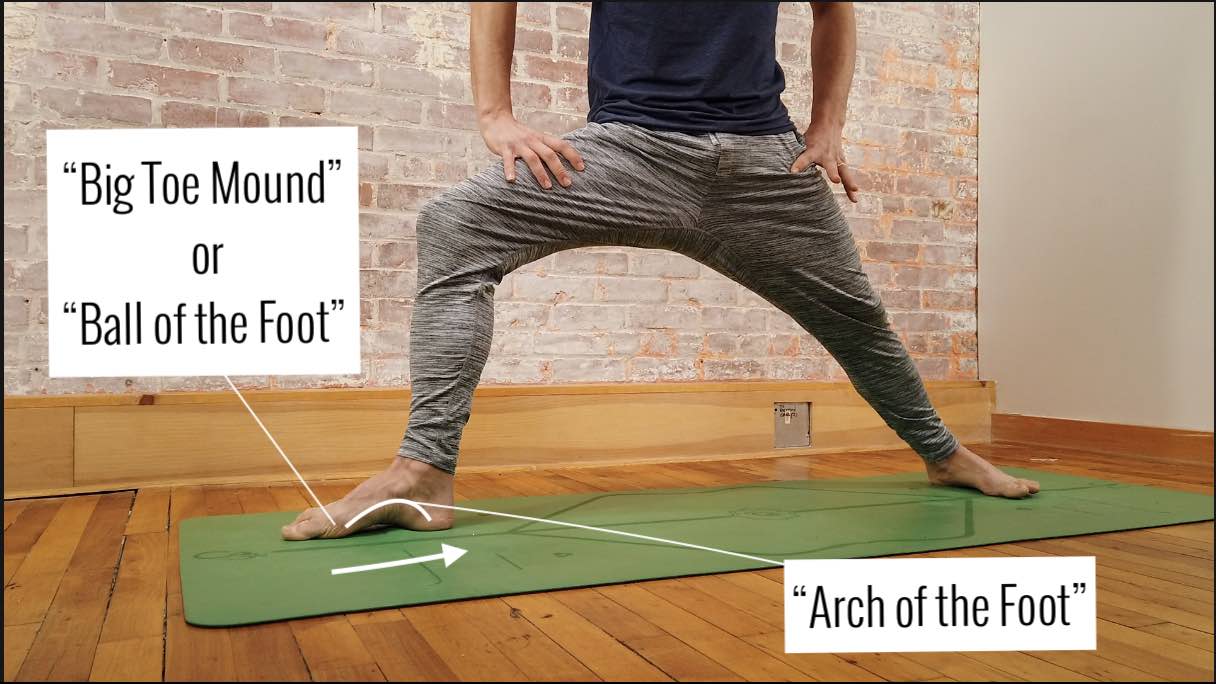
    3. Drag the big ball mound back toward the inner heel.
    inversion of the ankle - arch of the feet

    Step 1 - invert the ankle

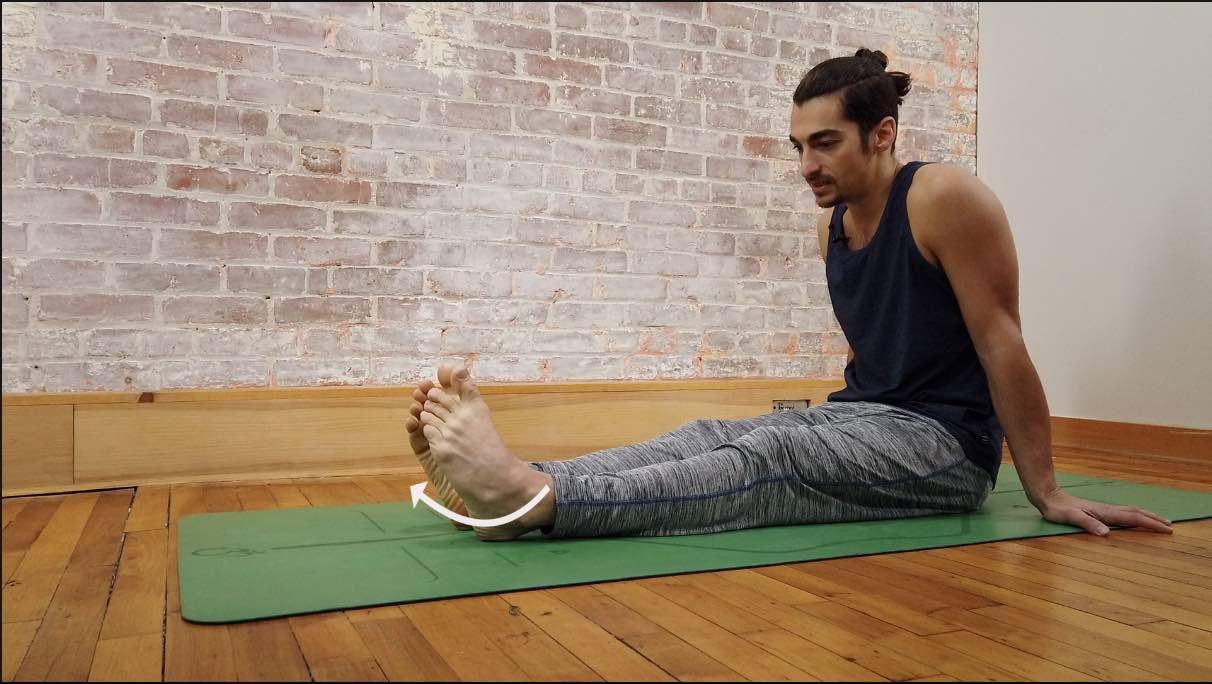
    While you can certainly evert the ankle first, I find for most people it is more effective to start with inverting the ankle when approaching standing postures. For clarity of the action, I am showing it in a seated position – try it seated first so you are very clear on how to invert. When in Warrior 2, press the outer edge of the front foot into the ground until your feel the muscle deep in the calf muscle activating. The ball mound and the big toe might lift when you do this – it is ok for now.

    evert the ankle in warrior 2 yoga pose

    Step 2: Evert the Ankle

    I recommend learning everting when seated – first, pull the outer edges of the feet back, it can be helpful to press the big toe and toe mound forward. When articulating this action properly you will feel the muscles along the outer shin engage. After you are aware of the action, the next part can be challenging. In warrior 2, be sure to maintain the muscle activation of inversion and add eversion by pressing the big toe and toe mound down into the ground, while trying to roll the outer ankle in slightly. Be sure not to fall flat into the inner arch while doing so – if this happens it means you are no longer activating the muscles of inversion, so go back to step 1 and try again.

    arch of the foot in warrior 2 yoga pose

    Step 3: contract The Arch

    While this step is optional, it can be really helpful especially for anyone that gets plantar fasciitis. The idea is to maintain steps 1 and 2 but then add an activation of the musculature along the bottom (plantar side) of the foot. The action is to try and drag the big ball mound of the foot toward the inner heel. Like inversion and eversion, this action can be quite foreign and may take a bit of time until you are able to feel the muscles contract. I really like to focus on this action in the change of seasons when I am switching between different shoes and my feet are trying to adapt to the differences.

    October Livestream Yoga Classes

    JOURNEY TO BLISS

    12 CLASS PACK - FULL BODY AWAKENING

    • Strong focus on ankles, feet & wrists
    • Release Stress Patterns in body and mind
    • Increase Shoulder and Spinal Flexibility
    • Includes 2 hour Workshop on Full Wheel Pose
    • Strengthen Your Core
    • Learn Breathwork and Meditation Techniques
    • Connect the the 5 Layers called The Kosha's
    • 12 All Levels Live Asana Classes
    • 4 Live Guided Meditations
    • Lifetime Unlimited Access to All
    • SALE: 1 Time Payment of $118

    The Results

    Activating the arch of the foot can be challenging at first. Typically the hardest part is learning how to co-contract opposing muscle groups. When opposing muscle groups contract at the same time, you get lifting and stabilizing of the joints. In this case, when you activate the muscles along the inside and outside the leg, it’s like pulling up your bootstraps and stabilizing the ankle. As a wonderful result, the arch of the foot pulls up.

    Integration

     To fully integrate these actions into your practice you will need repetition throughout all of your standing postures. Try it in your next class, or if you want a full workshop that incorporates these exact actions throughout, check out Hips: Rock Em and Unlock Em workshop below.

    Thanks for stopping by. Leave a comment if this post has been helpful, or if you have questions or requests for future posts.

    October Livestream Yoga Classes

    BEST SELLING PACKAGE!

    8 CLASS PACK INCLUDES CLASSES FOCUSED ON:

    1. Flying Pigeon
    2. Half Lotus (avoid knee pain)
    3. Compass Pose
    4. Bow Pose & Wild Thing
    5. Crow Pose & Half Firefly

    • 6 All Levels Yoga Practices
    • 2 Guided Meditations
    • 6 Different Peak Postures 
    • Compass Pose Full Length Class
    • Flying Pigeon Full Length Class
    • Unlimited Views + Lifetime Access

    Continue Learning

    Wake Up Your Wheel Pose

    Wake Up Your Wheel Pose

    Wake Up Your Wheel Poseheart openerWAKE UP YOUR WHEEL POSE We don’t have to question it—we know whether or not we’re feeling open, free, and strong in Wheel Pose. There’s a lightness and expansiveness that takes over when everything falls into place: From the initial...

    read more
    Spinal Spaciousness

    Spinal Spaciousness

    Spinal Spaciousnessdancer poseSPINAL SPACIOUSNESS Some key indicators of spinal health include strong bones, durable yet flexible ligaments, supple discs, and strong supportive muscles. Aside from nutrition, it’s not enough to say that movement in general is enough to...

    read more
    Steps To Scorpion Pose

    Steps To Scorpion Pose

    Steps to Scorpion PosevrschikasanaSCORPION POSE Exhilarating, stimulating, and enlivening are a few words we can use to describe Scorpion Pose. We can also use words such as grounding or even relaxing, which might initially be considered strange descriptors. When we...

    read more
    Heart Opening Education

    Heart Opening Education

    Heart-Opening EducationbackbendHEART-OPENING EDUCATION There is a great deal to learn with regard to heart-opening postures. Of course, negotiating the execution and being aware of the anatomy involved in various heart-opening poses are some of the initial...

    read more
    Pranayama

    Pranayama

    PranayamabreathworkPRANAYAMA Pranayama helps us to more deeply connect to the energy that runs through us. This can be done via a variety of breathwork practices. It’s important to understand that the breath is the physical layer through which we can access prana...

    read more
    Hip Opening Without Knee Pain

    Hip Opening Without Knee Pain

    Hip Opening Without Knee Painhip mobilityHIP OPENING WITHOUT KNEE PAIN "Hip opening” in a yoga class just sounds glorious if we feel confined or constricted in this area of the body and our intention is to transform this experience. The term may not sound glorious,...

    read more

    THE FREE TECHNIQUE PACK

    When You Subscribe, You Will Get Instant Access to

    • the Technique Pack: 15 yoga pose breakdowns
    • exclusive online course discounts
    • exclusive blogs and videos
    • This field is for validation purposes and should be left unchanged.

    Triangle Pose: Trick to Avoid Hip Impingement

    Triangle Pose

    Avoid Hip Impingement & Increase Your Range of Motion

    Triangle Pose

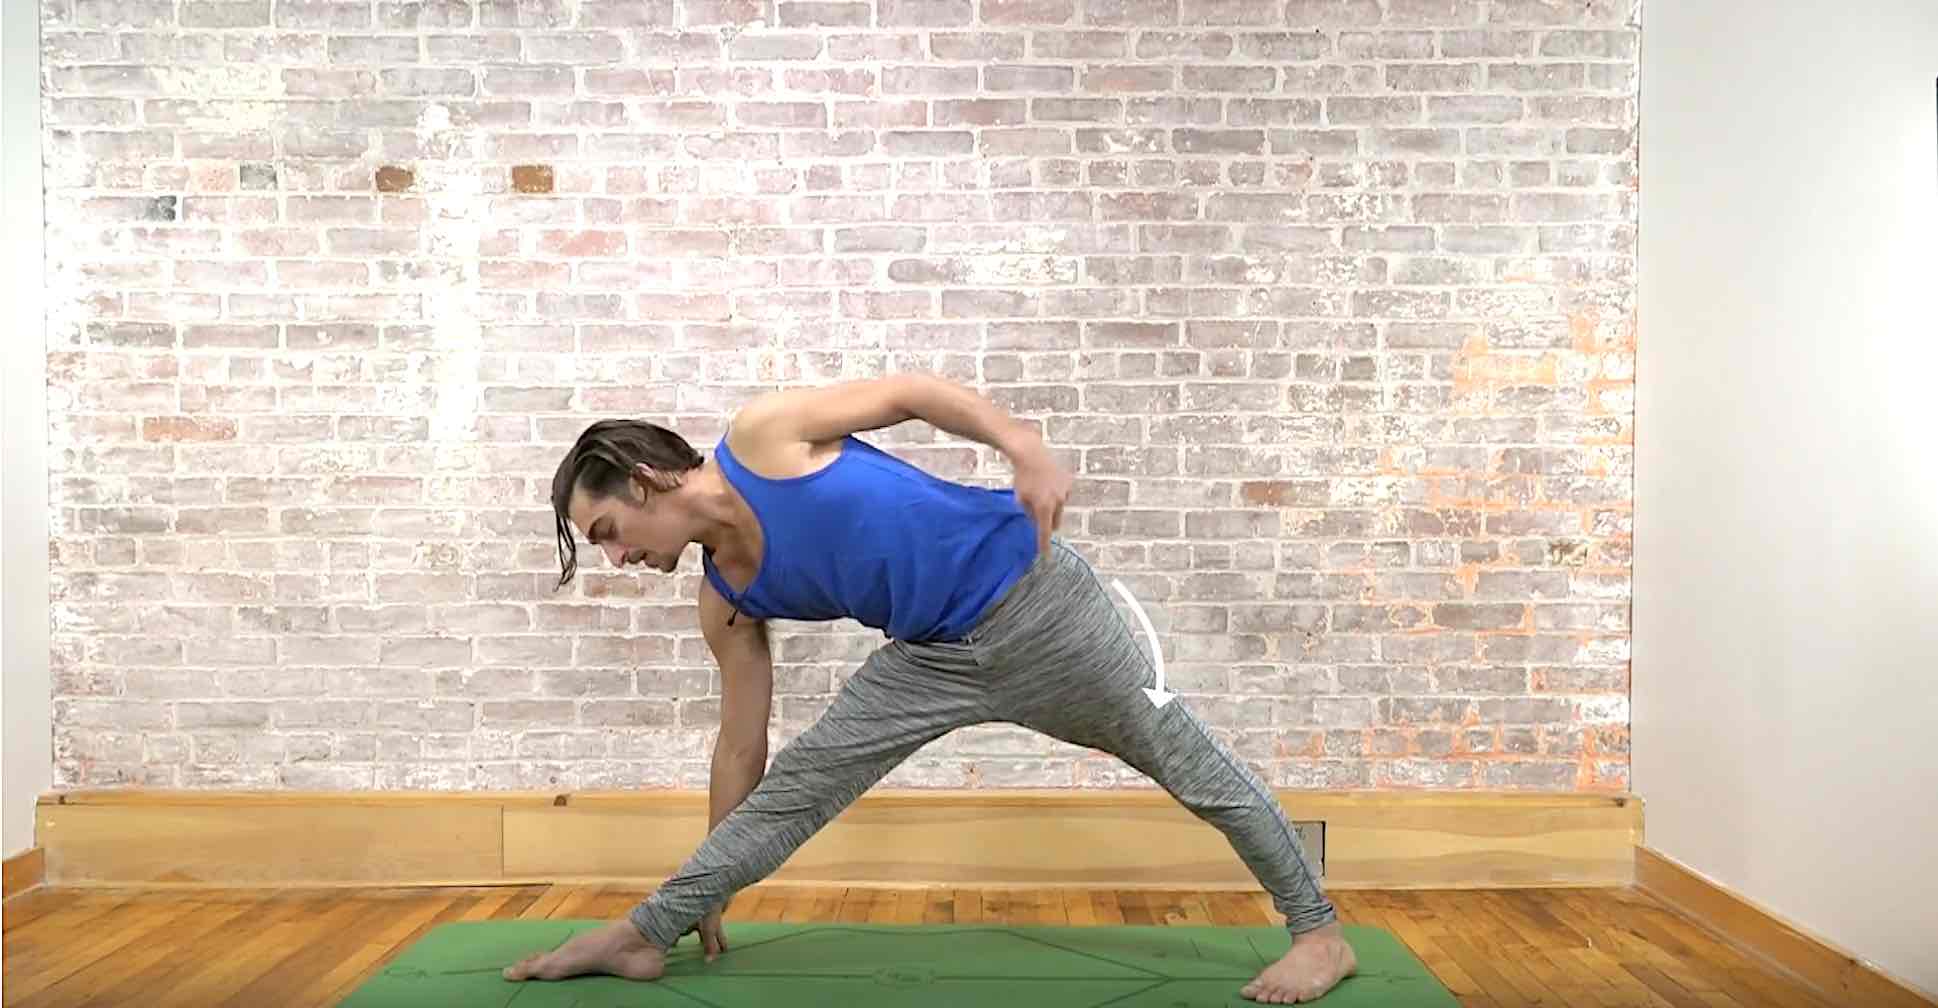
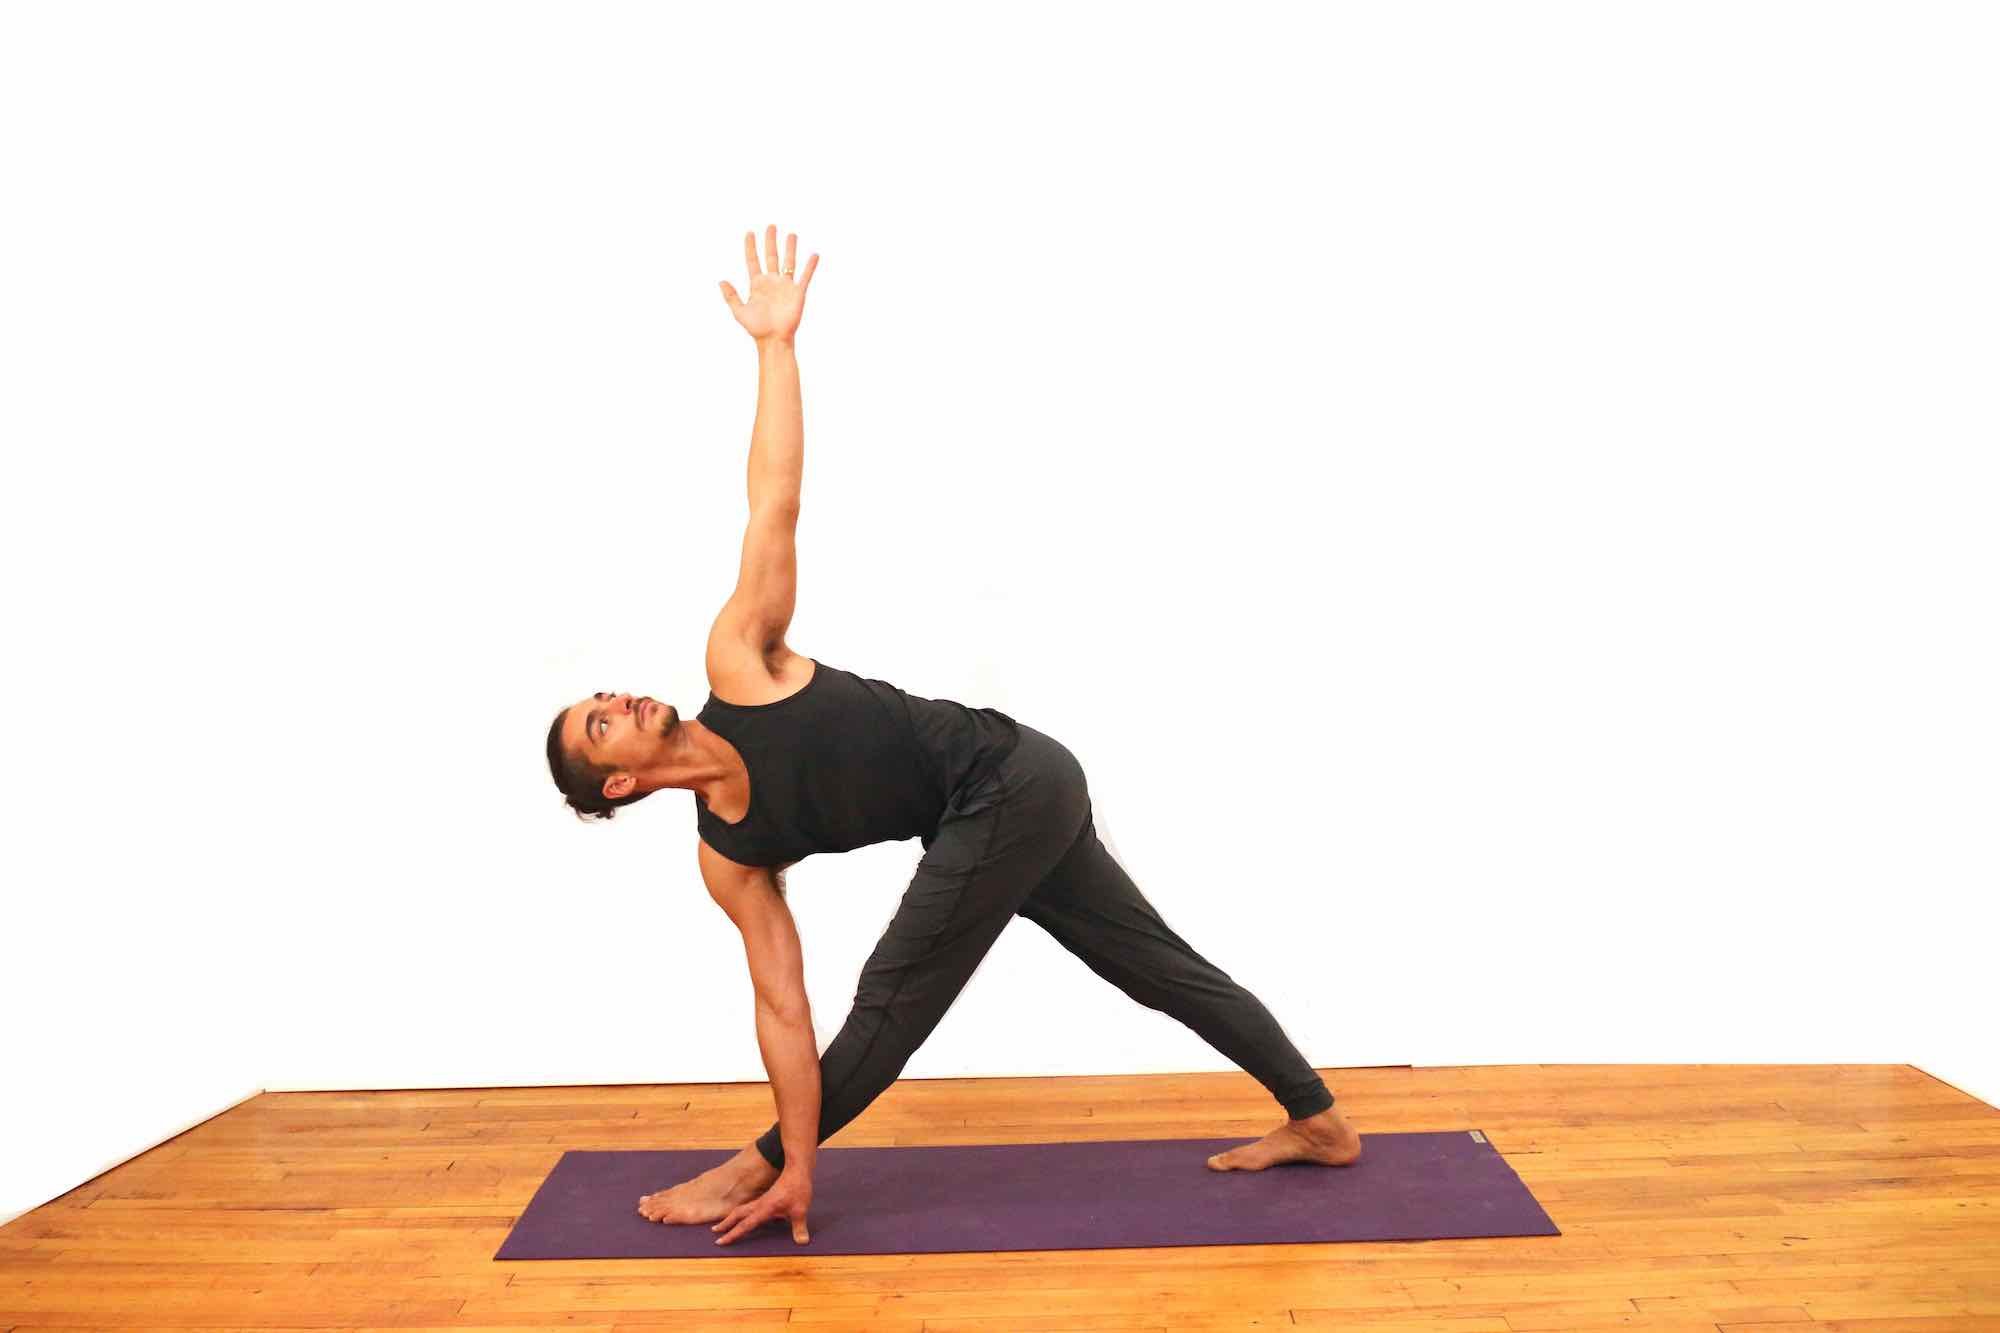
    Triangle pose is an iconic posture in yoga that has tremendous benefits for increasing hip range of motion by creating more flexibility of the hamstrings and adductors (inner thigh muscles). There are several potential strength benefits that triangle pose has to offer, however, it requires an intentional activation of our muscles and they likely won’t engage on their own. In the video and photo breakdown below, I go over my favorite muscle activations for triangle pose. From my experience in practicing triangle pose with teachers across the world, I have heard these verbal alignment cues more often than not: “Square your pelvis to the sidewall, tuck your tail bone, and place your hand on your shin, block, or ground.” When I practice, I try to really do what the teacher asks, but every time I tried this I noticed an immediate pain in my hip that I never get when I approach triangle pose on my own or coming from a posture like side angle pose. I also noticed that if I maintain these alignment cues, my hand only goes to my shin at best unless I fall into a deep side bend. Knowing the anatomy of the hip, I assumed that this alignment increased the potential compression at the hip joint, and maybe caused the soft tissue to be pinched. I decided to do some research on Hip FAI (femoral acetabular impingement) or hip impingement.

    The Research

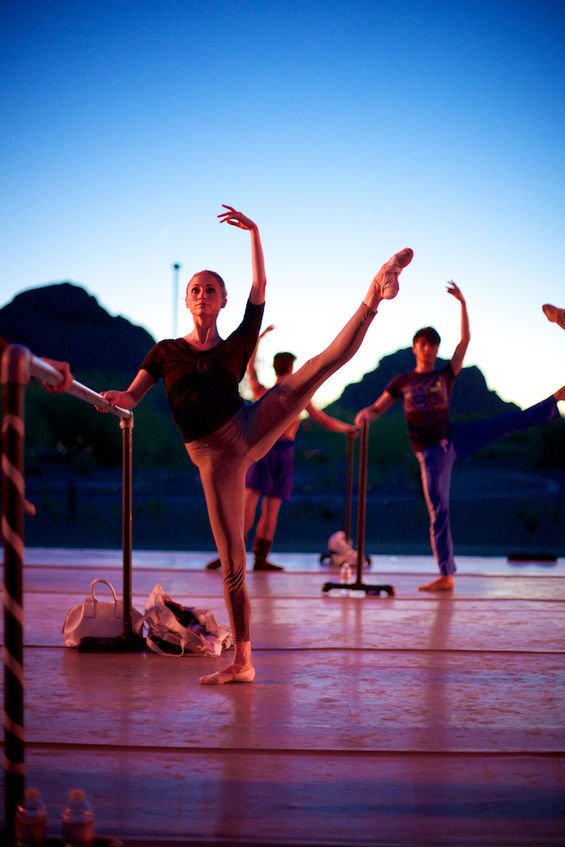
    After much research on Hip FAI (femoral acetabular impingement), I was hoping to bring you conclusive data on how yoga could cause or help hip impingement, however, the current research on yoga specifically is minimal and mostly all over the place. It is commonly agreed that range of motion and proper strength training can help prevent hip impingement. It is also commonly agreed that many athletic sports could be the cause of it, as well as childhood development of the bones and joints. There is however an interesting study that showed increased impingement and stress on the hip joint in dancers when performing specific dance positions which include external rotation and posterior titled pelvis. The research doesn’t mention these specific structural alignments, however, being the husband of a dancer raised on ballet I was able to confirm my suspicion about these pelvis and femur bone alignments. In ballet you are asked to keep the low back long which is a posterior tilt of the pelvis – often cued as “tuck your tail” in yoga classes. One pose in the research article stood out to me: développé à la seconde, which is essentially standing triangle pose or Utthita Hasta Pandangusthasana B. The photo of my good friend Beau Campbell (@theyogarina) to the right (below on mobile) shows the posture in the study. Food for thought: If this posture is creating compression at the hip, what happens when you add the weight of gravity as we do in triangle pose. 

    yoga backbend techniques: 12 classes [backbend technique to relieve back pain "bowing the spine']

    HIPS & HAMSTRINGS

    ONLINE YOGA IMMERSION

    • 12 classes to increase flexibility of the hips and hamstrings
    • Maximize your strength through range of motion
    • Access your pose potential
    • Release tension of hips and back
    • Sensation-based practices
    • Unlock and strengthen major muscle groups
    • Active, passive, and isometric stretching
    • Improve mobility and stability
    • So much more!

    $148.00 $128.00

    MORE INFORMATION

    What is Hip Impingement 

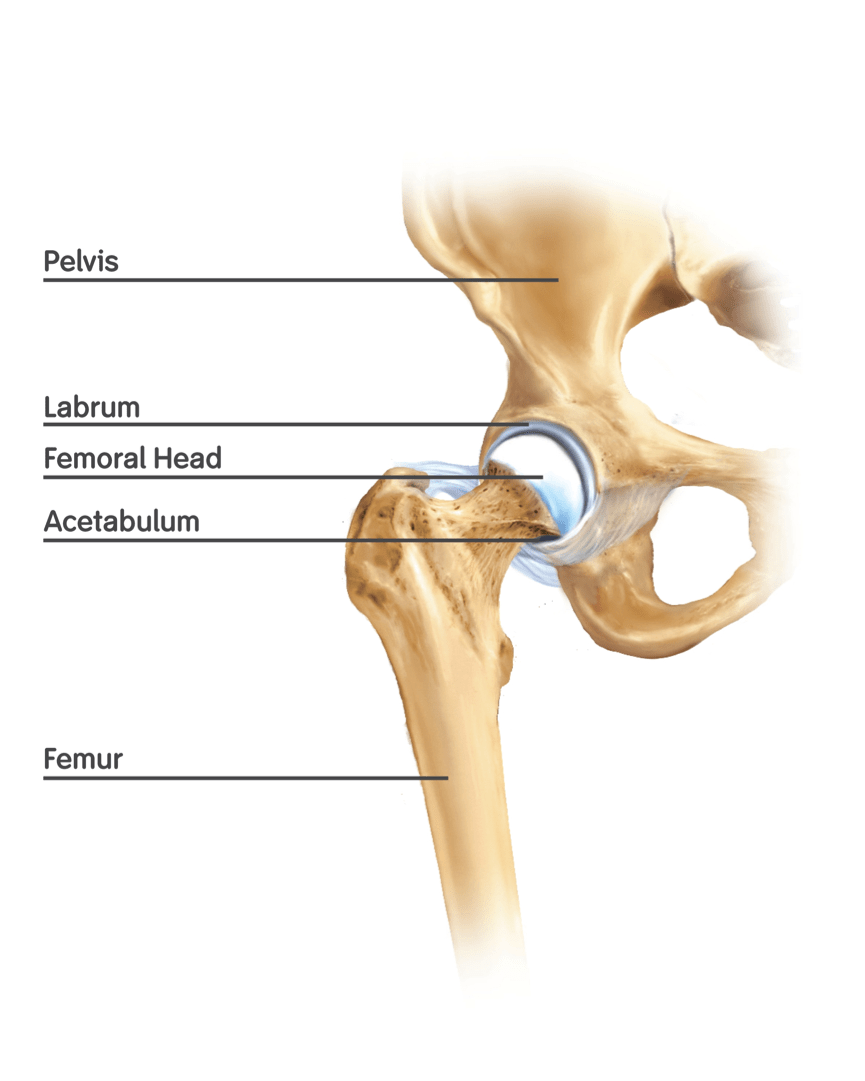
    Hip impingement is the result of increased friction or damage of the soft tissue that makes up the hip joint. The hip joint is where the thigh bone and pelvis connect. It is a ball and socket joint – the head of the femur (thigh bone) is a round “ball” and the pelvis has a “socket” that receives it. There are soft tissues that cover and surround the bones so that the joint becomes slippery and smooth. Articular cartilage covers the two bones, and the labrum is like a gasket that forms a tight seal around the joint. When these soft tissues become inflamed, irritated, or damaged it is referred to as hip impingement. Some Hip impingements are the result of the way our bones were formed growing up, and others could be the result of repetitive high impact exercises or sports. A healthy hip joint is one where there is no wear and tear of the soft tissues.

    Are there other Kinds of hip injuries?

    Hip impingement is not the only kind of injury around the hip area. The hip is surrounded by ligaments, muscles, fascia, and nerves that can all become injured due to stress, strain, or structural miss-alignments. Just because you have hip pain does not mean you have an impinged hip. We are also coming to realize that not all physical pain exists in the body, but can also be stemming from mental or emotional trauma. What should you do if you have hip pain? Don’t freak out- see a specialist to assess where the pain is stemming from so you can take proper action to support your health. It could be a pulled muscle, or as simple as a muscle that is hyperactive and causing a myriad of issues. Physical therapy, Acupuncture, and Massage are all great healing modalities to try.

    ONLINE TEACHER TRAININGS


    GET CERTIFIED AT THE 200 OR 500 HOUR LEVELS

    • 200 Hour Training: Get certified to teach yoga
    • 300 Hour Training: Take your certification to the 500 hour level
    • Recognized globally by Yoga Alliance 
    • Take your practice to the next level
    • All levels, ages, and experience welcomed

    4 Steps TO ENTER TRIANGLE POSE 


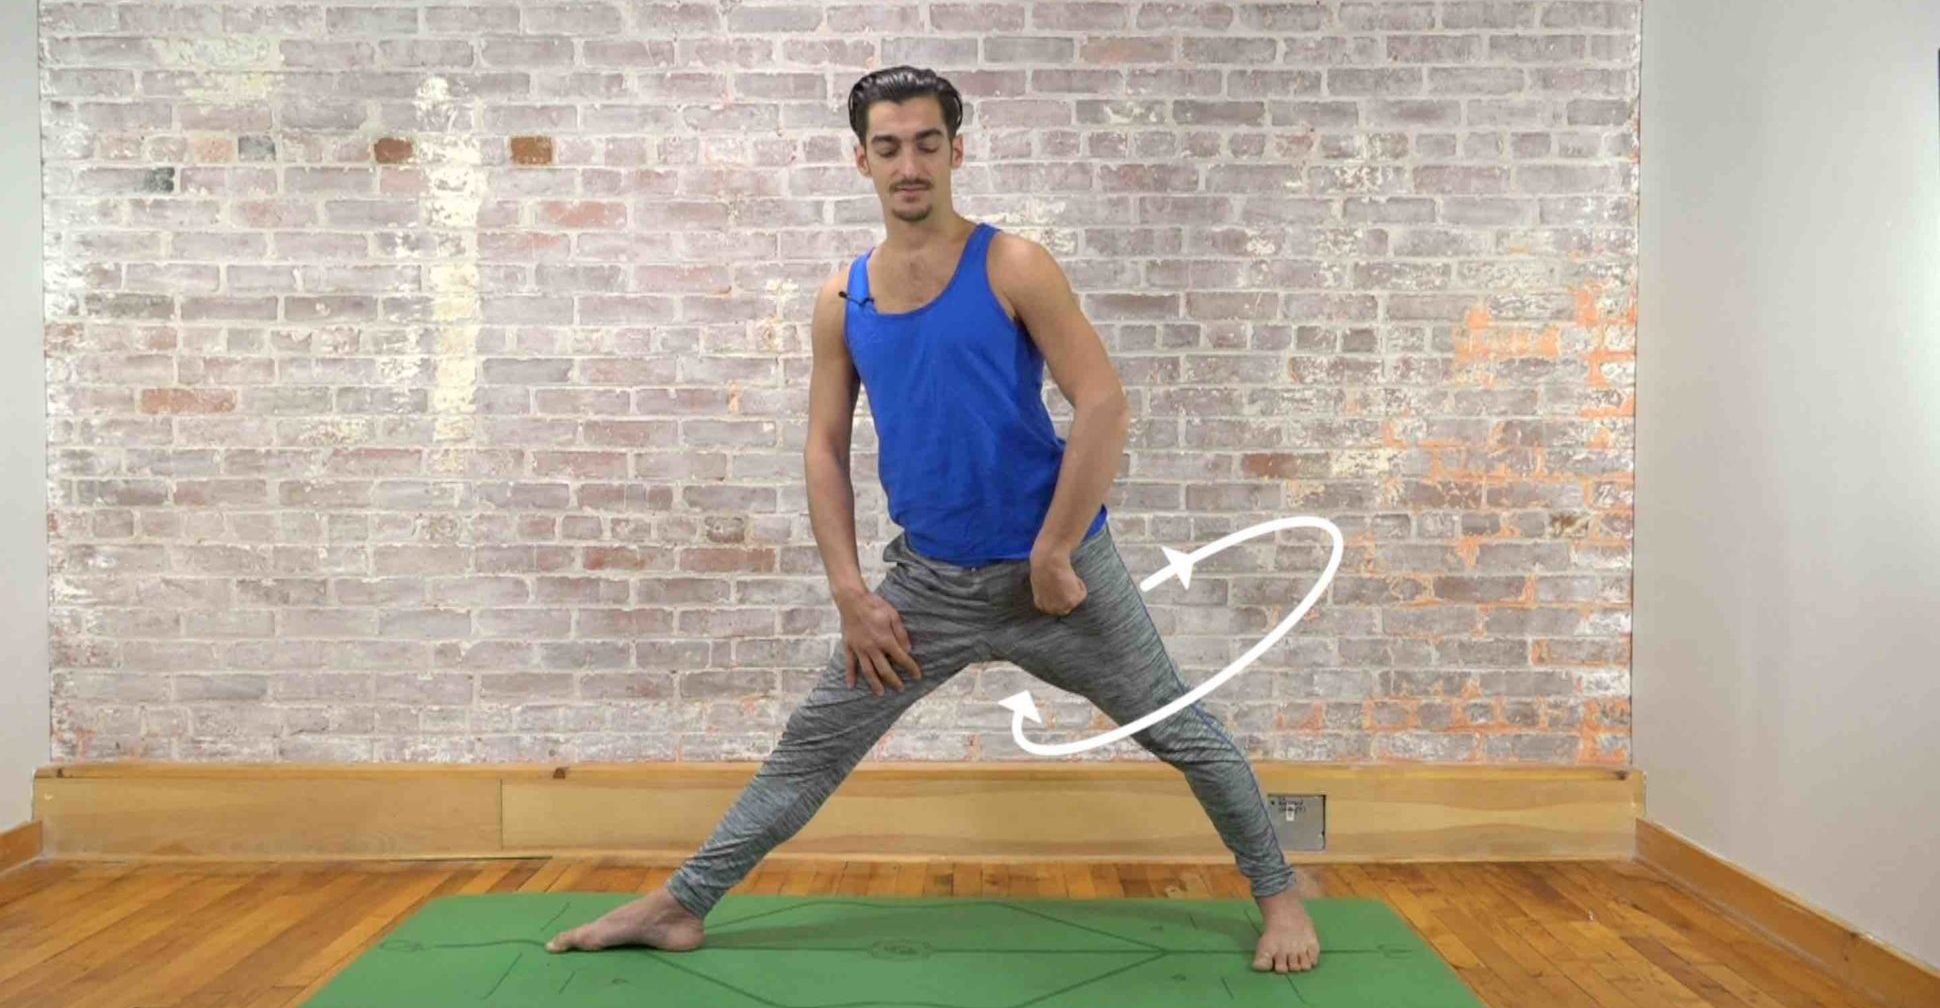
    Step 1 - Internal rotation

    Rotate the back foot, thigh bone, and pelvis inward toward the front leg. No need to overdo this like you would when trying to square the hips in a lunge pose. How much to turn in will depend on you and your structure so go slow and try various angles and observe what you feel. This will increase the amount of possible joint mobility, but tight hamstrings might still inhibit the range of motion.

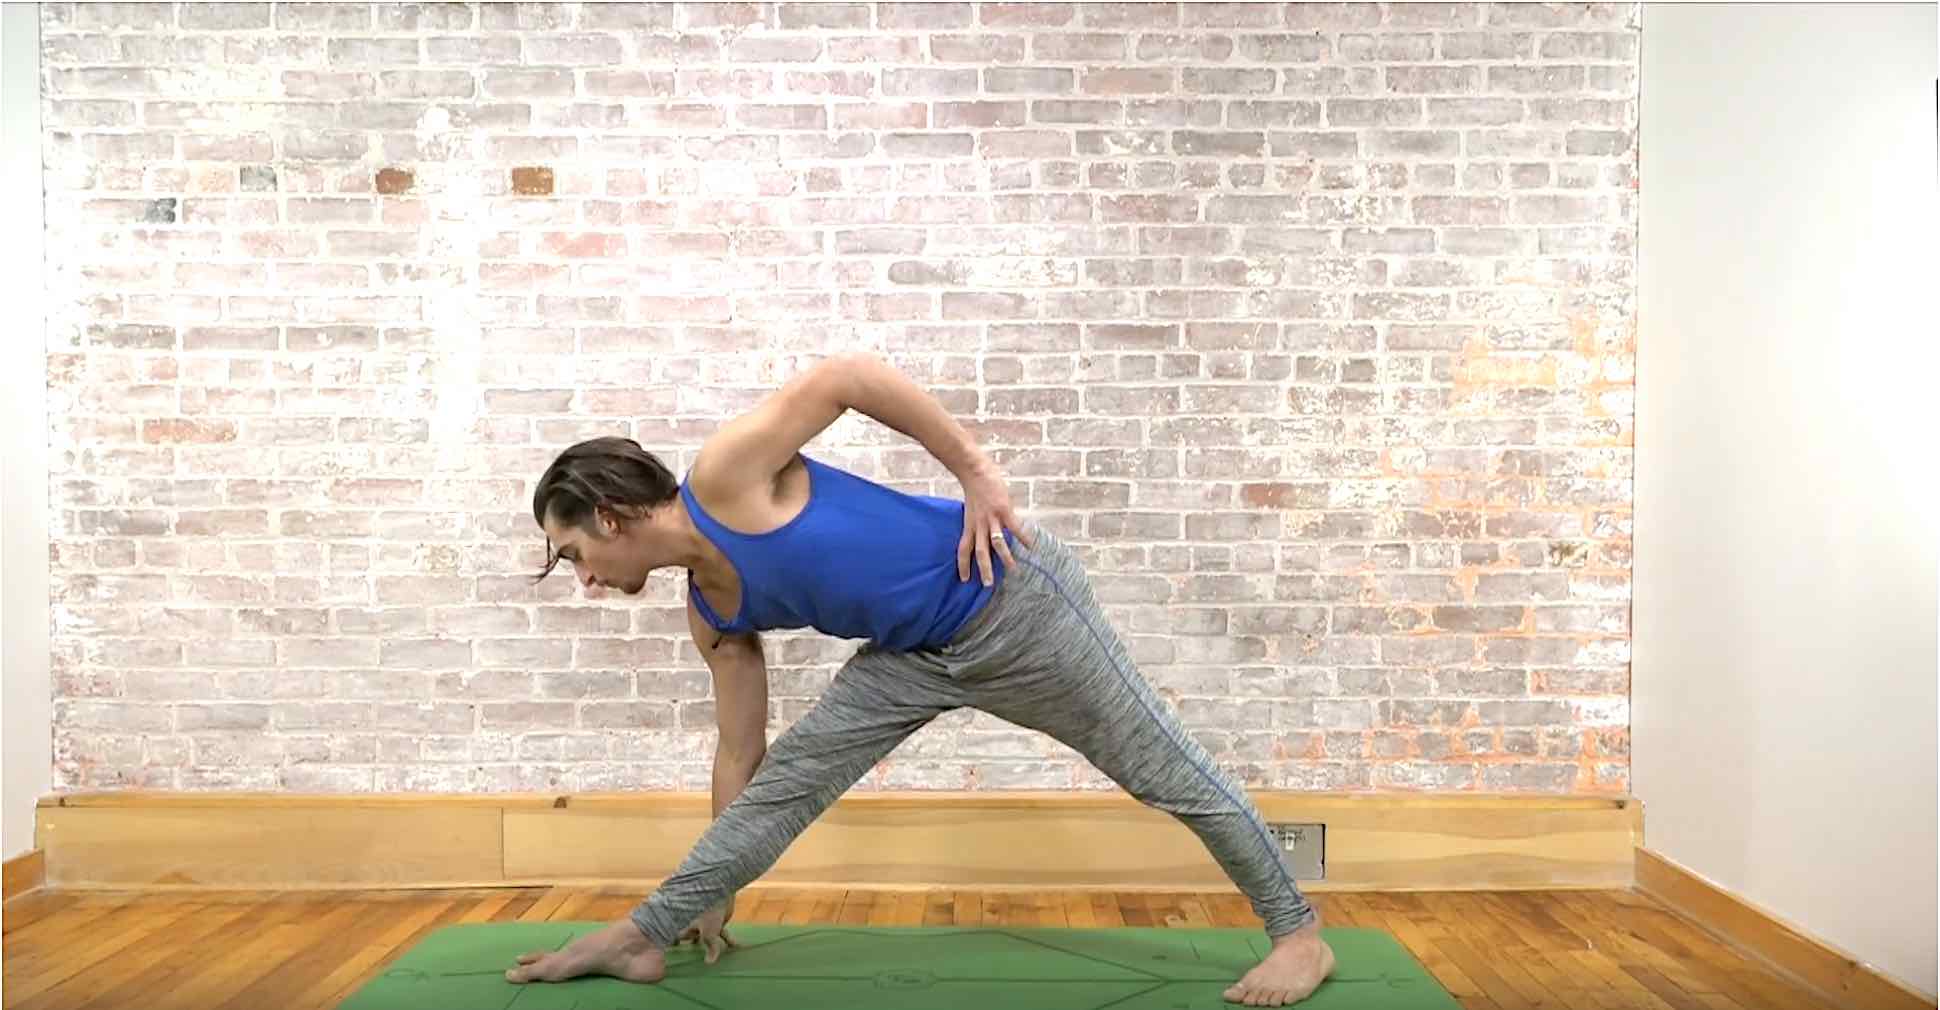
    Step 3: Glute Activation

    From your front buttocks press down into your heel until you feel your pelvis starts to open back toward the sky (the opposite of step 1). Ideally, activating both gluteus Maximus and gluteus medius/minimus as you do so. This likely will all happen when you press down, but if your pelvis doesn’t rotate open and your outer hips don’t engage, try pressing your inner heel down and outward.

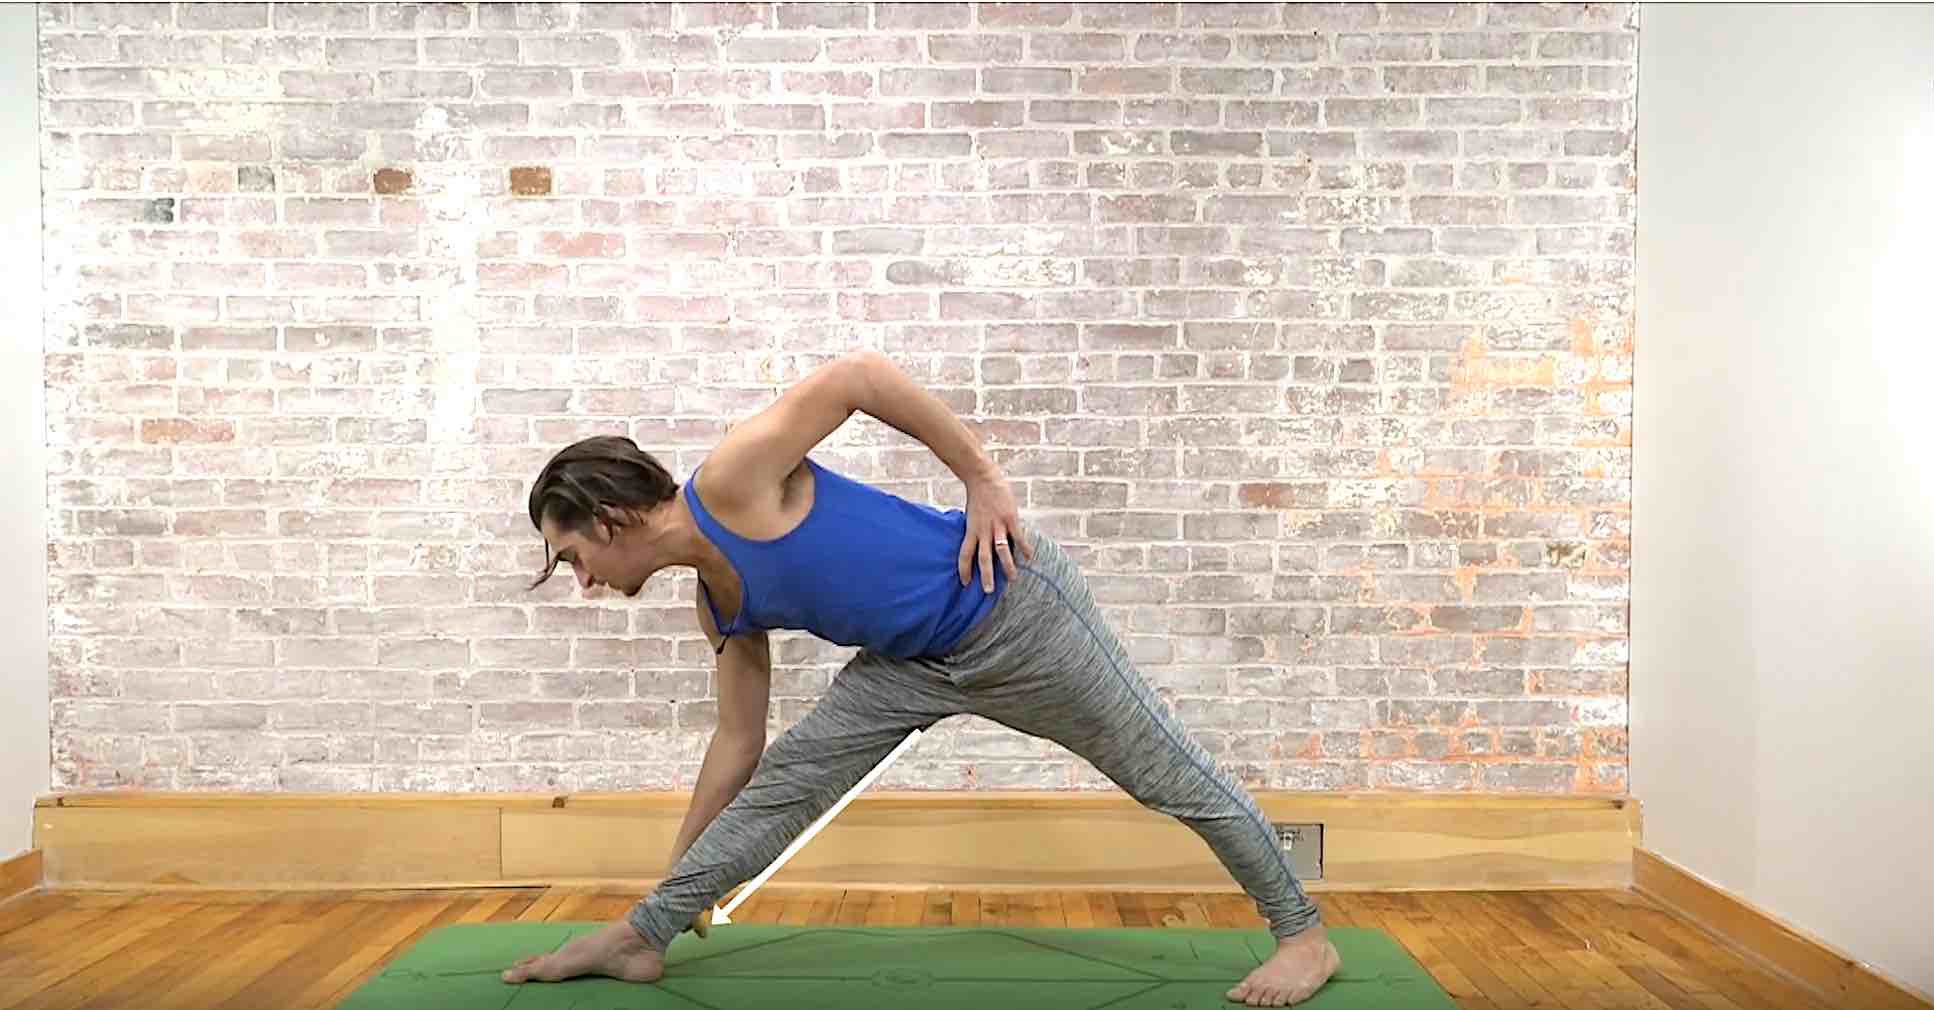
    Step 2: bow at the pelvis

    Flex (or bow) at the hip joint to bring your front hand to the block or the ground I personally avoid asking students to go to the shin as not to put more downward pressure into the front knee. Personally, I come to fingertips as it’s a bit easier than full palm and still grounded.  Press down into your hand for support and activation of your deep core – psoas muscles.

    Step 4: Counter Action

    Similar to step 1, we are trying to rotate the thigh and hip inward again, however, the major difference is that in step 4 it is simply an activation of the muscles, not an actual movement of the bones. Counteraction creates stability and also helps to prevent going too deep into the end range of motion which could bring you right back to impingement or just an overstretch of the adductors.

    yoga backbend techniques: 12 classes [backbend technique to relieve back pain "bowing the spine']

    HIPS & HAMSTRINGS

    ONLINE YOGA IMMERSION

    • 12 classes to increase flexibility of the hips and hamstrings
    • Maximize your strength through range of motion
    • Access your pose potential
    • Release tension of hips and back
    • Sensation-based practices
    • Unlock and strengthen major muscle groups
    • Active, passive, and isometric stretching
    • Improve mobility and stability
    • So much more!

    $148.00 $128.00

    MORE INFORMATION

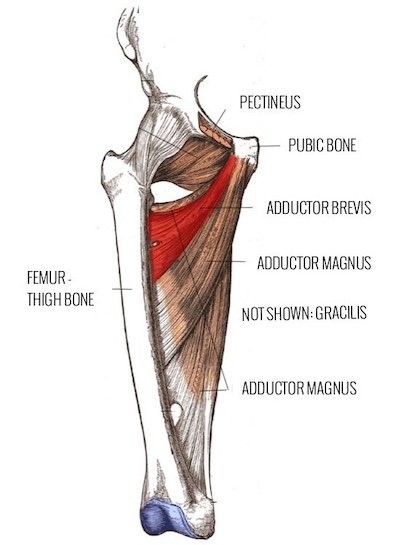
    The Adductors

    The muscles along the inner thigh are referred to as the adductor group, and typically serve to bring the thigh bones toward the midline of the body, but they can also internally rotate the thighbones, extend them backward like the hamstrings (adductor magnus) and even externally rotate when in deep extension. The adductors also help to stabilize the pelvis.

    Practicing Triangle

    Is triangle a high-risk posture? Probably not on my list of postures to avoid, but depending on your body and how you approach it, it may have massive benefits or setbacks. The steps I have provided for you have helped me feel better in my triangle pose, and many students have felt the same. This doesn’t mean it will be best for you, so proceed with presence, observe what you feel as you practice, and go slow enough to be able to make choices. There are many more potential options of how to isometrically activate your muscles in postures like triangle. Should you want to learn more please check out the Hips: Rock Em and Unlock Em workshop below.  Leave a comment if this post has been helpful or if you have questions or requests for future posts.

    ONLINE TEACHER TRAININGS


    GET CERTIFIED AT THE 200 OR 500 HOUR LEVELS

    • 200 Hour Training: Get certified to teach yoga
    • 300 Hour Training: Take your certification to the 500 hour level
    • Recognized globally by Yoga Alliance 
    • Take your practice to the next level
    • All levels, ages, and experience welcomed

    Continue Learning

    Wake Up Your Wheel Pose

    Wake Up Your Wheel Pose

    Wake Up Your Wheel Poseheart openerWAKE UP YOUR WHEEL POSE We don’t have to question it—we know whether or not we’re feeling open, free, and strong in Wheel Pose. There’s a lightness and expansiveness that takes over when everything falls into place: From the initial...

    read more
    Spinal Spaciousness

    Spinal Spaciousness

    Spinal Spaciousnessdancer poseSPINAL SPACIOUSNESS Some key indicators of spinal health include strong bones, durable yet flexible ligaments, supple discs, and strong supportive muscles. Aside from nutrition, it’s not enough to say that movement in general is enough to...

    read more
    Steps To Scorpion Pose

    Steps To Scorpion Pose

    Steps to Scorpion PosevrschikasanaSCORPION POSE Exhilarating, stimulating, and enlivening are a few words we can use to describe Scorpion Pose. We can also use words such as grounding or even relaxing, which might initially be considered strange descriptors. When we...

    read more
    Heart Opening Education

    Heart Opening Education

    Heart-Opening EducationbackbendHEART-OPENING EDUCATION There is a great deal to learn with regard to heart-opening postures. Of course, negotiating the execution and being aware of the anatomy involved in various heart-opening poses are some of the initial...

    read more
    Pranayama

    Pranayama

    PranayamabreathworkPRANAYAMA Pranayama helps us to more deeply connect to the energy that runs through us. This can be done via a variety of breathwork practices. It’s important to understand that the breath is the physical layer through which we can access prana...

    read more
    Hip Opening Without Knee Pain

    Hip Opening Without Knee Pain

    Hip Opening Without Knee Painhip mobilityHIP OPENING WITHOUT KNEE PAIN "Hip opening” in a yoga class just sounds glorious if we feel confined or constricted in this area of the body and our intention is to transform this experience. The term may not sound glorious,...

    read more

    TOP RECOMMENDATIONS 

    Handstand Training

    Learn the techniques that make Handstand fun, easy and accessible! This 2 part course consists of the top most effective exercises will increase your strength and technique so you can easefully balance a handstand.

    View Details

    SHOULDER REVELATION

    In this 12 class immersion  you will practice specific techniques to strengthen and unlock your shoulders. Each class focuses on a specific joint articulation and muscle group so you gain mastery in the shoulders.

    View Details

    HEART OPENERS

    Finally, a 12 class immersion designed specifically to help you discover the freedom of heart openers. Learn how to avoid uncomfortable compression, and awaken your true range of motion in a step by step manner.

    View Details

    THE FREE TECHNIQUE PACK

    When You Subscribe, You Will Get Instant Access to

    • the Technique Pack: 15 yoga pose breakdowns
    • exclusive online course discounts
    • exclusive blogs and videos
    • This field is for validation purposes and should be left unchanged.

    Contact Matt

    • This field is for validation purposes and should be left unchanged.

    find your seat

    3 BEST SEATED MEDITATION POSTURES

    Find Your Seat: 3 Ways to Sit without Knee, Hip or Back Pain!

    Find Your Seat

    Let’s go over the 3 best seated meditation postures and find out which one is right for you. The deep benefits of seated meditation are well known to have been experienced by many. On the other hand, people around the world find the practice to be inaccessible because they can’t sit comfortably for more than a minute. This is true for me, even to this day! No matter how open my hips are, or how strong my core and back are, if I try and sit on the ground for an extended period of time one of my legs will fall asleep or I will at the least just be uncomfortable. If you have the same experience, you will find these particular postures to be very supportive!

    THE CHALLENGES

    Why is it challenging to sit? There are a host of reasons why we might find it difficult to sit on the ground – perhaps primarily because we just don’t do it. Sitting in a chair does not allow our hips to go through their full range of motion each day and as a result, our back and hip flexors don’t develop the strength needed to keep us upright. Yoga can serve as an amazing practice to redevelop the capacity to sit more efficiently although it won’t happen overnight – which is why it’s necessary to check out the 3 postures in the video and photos below, so you can sit comfortably on the ground while you are working on the long term hip-opening journey.

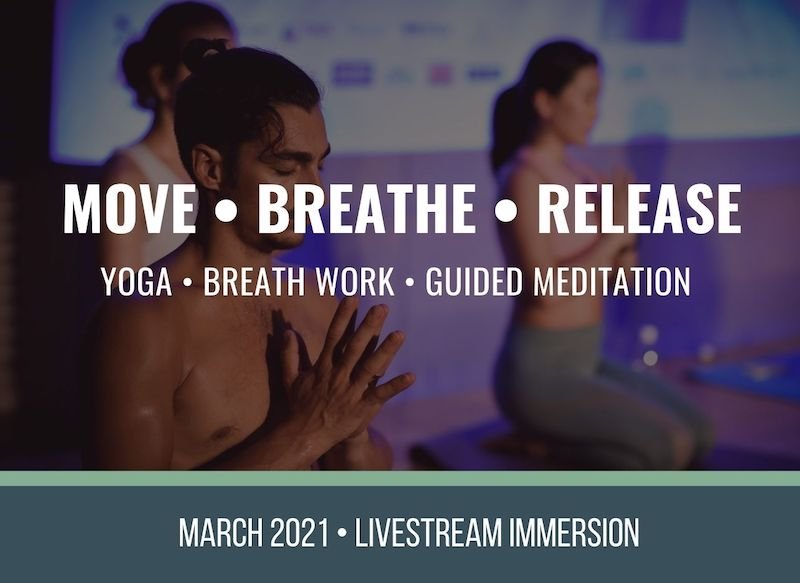
    Trying to re-pattern our body takes repetitive practice. As with any other skill, you can only learn from doing it. That is why I created a 12 class immersion to help you feel better, sit better, and establish a meditation practice. MOVE•BREATHE•RELEASE helps you increase flexibility of the hips, strengthen your back muscles for better posture, teach you breathwork techniques, and gives you the tools for mental and emotional clarity and freedom. Meditation requires guidance just like yoga, and I guide you in all 12 classes so you feel safe, confident, and inspired with each practice.

    MOVE•BREATHE•RELEASE

    12 Class Package for Yoga, Pranayama, and Meditation

    • Breathe better with pranayama “breathwork” exercises
    • Release Hip Tension with asana practice
    • Increase Flexibility & Strength
    • Increase Focus and Clarity
    • Decrease Stress
    • Unwind physical & Emotional Tension
    • Move more freely
    • Release low back tension through hip opening
    • 12 All Levels Live Asana Classes
    • Lifetime Unlimited Access to All  

    Is Meditation Calming?

    When Most people begin a meditation practice they expect it to have the results that everyone preaches; calm mind, relaxing, stress reducing. While some people do experience these results right away, others may experience the opposite. In weight lifting you must build a foundation of strength before you can move on to heavy compound movements, and establishing this foundation can at times be challenging and discouraging. Meditation is very much the same, the practice of it might feel like you are lifting heavy weights for your mind and as a result, you might initially only experience the challenge of it. With repetition, your mind will get stronger. You will be able to focus longer and the results will come faster!

    On top of it, if you are physically uncomfortable when practicing meditation you are not likely to magically walk away feeling calmer. This is why it’s important to find a seat by selecting from one of the 3 best seated meditation postures.

    VIDEO TO FIND YOUR SEAT

    CHOOSE FROM THE 3 BEST SEATED MEDITATION POSTURES

    Assess your hips

    Each of us has our own movement patterns which cause some muscles to be stronger, some weaker, some are tight, some are not, etc. We also have different bone structures that will make some positions easier than others. Finding a comfortable seat is one of the most important aspects of a seated meditation posture. If you are uncomfortable, it is very hard to move the mind beyond the discomfort of the body. This is why I have provided three options for seated meditation postures. Go through each and ask yourself which one is most sustainable. Keep in mind there is no perfect seated posture for meditation, there is only the best one for you and that is the one you feel most comfortable in and that also allows you to stay awake and present.

    “3 Best Seated Meditation Postures” Detailed Break Down

    best seated meditation posture

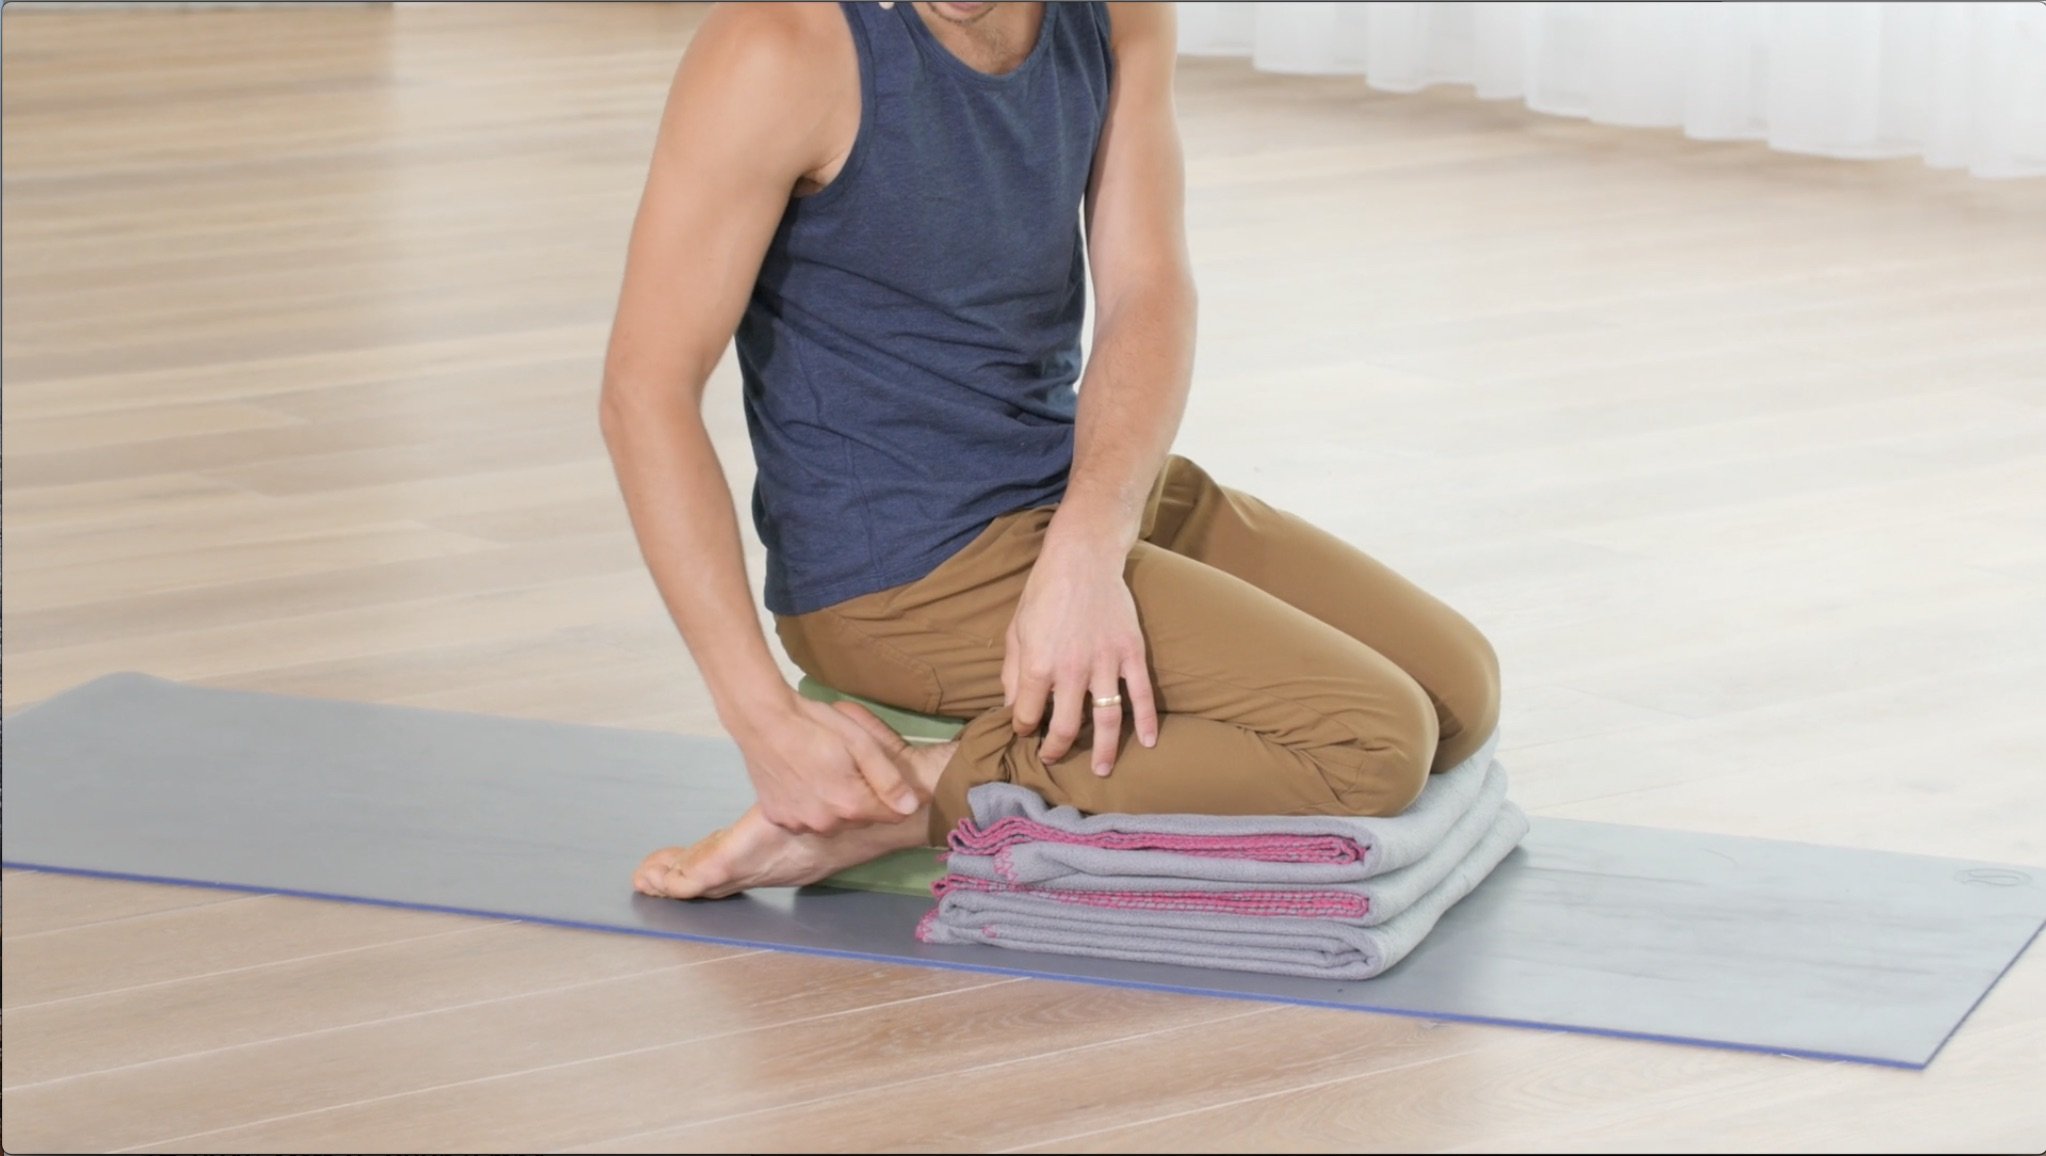
    Option 1 - Bhadrasana (Hero's Pose)

    My personal favorite seated posture for those who have tighter outer hips and inner thighs as it requires little flexibility in these areas. It presents a challenge for those with tight quads and shin muscles. Using blankets and blocks can help alleviate these challenges. I would suggest warming up and stretching the thighs and ankles prior to working on this posture. In the above video, I go over a twisted thigh stretch and a seated posture on heels. If these postures prove to be too challenging after a warm-up, then this posture is likely to cause discomfort during a seated meditation.

    best cross legged seated meditation posture

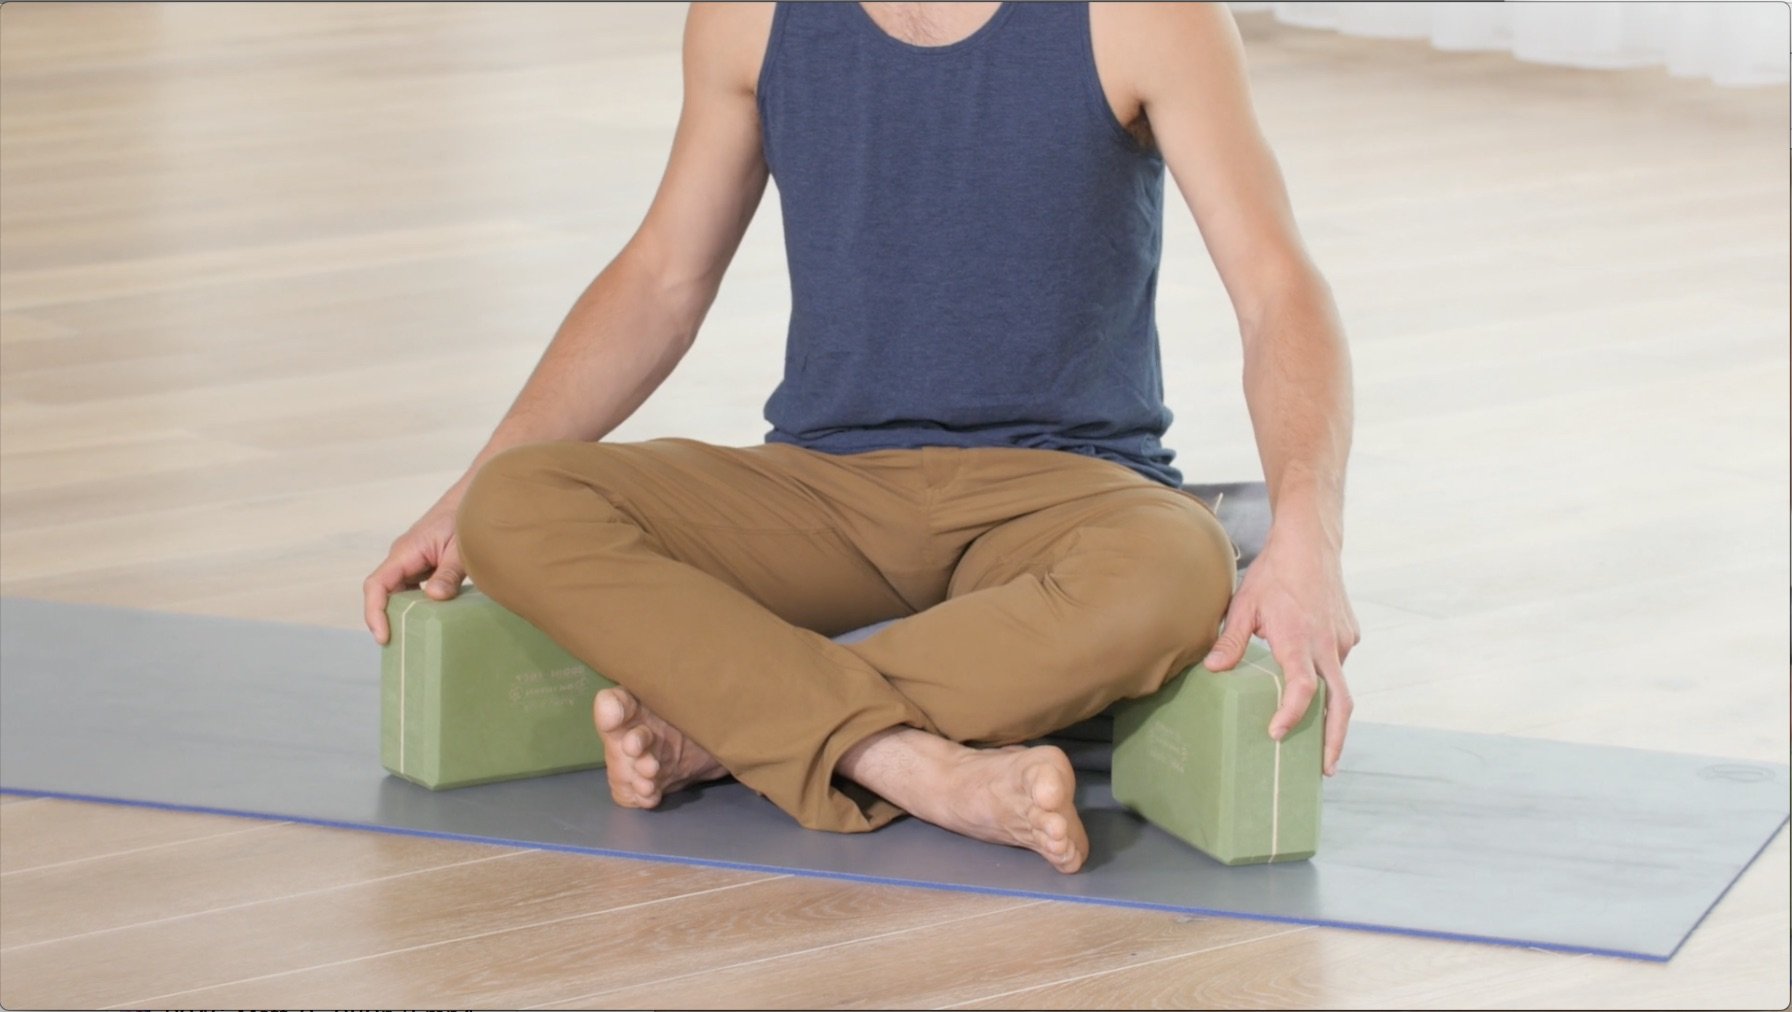
    Option 2: Cross Legged

    Sukhasana, the so-called “easy seat” – an ironic title, as it can be incredibly misleading. For those with open inner thighs, hip flexors, and outer hips this can be an easy posture indeed, but if that is not the case for you then you’ll definitely want to use props. Using the right amount of blankets and block support can make this posture easier and more accessible.

    seated meditation posture on chair with props

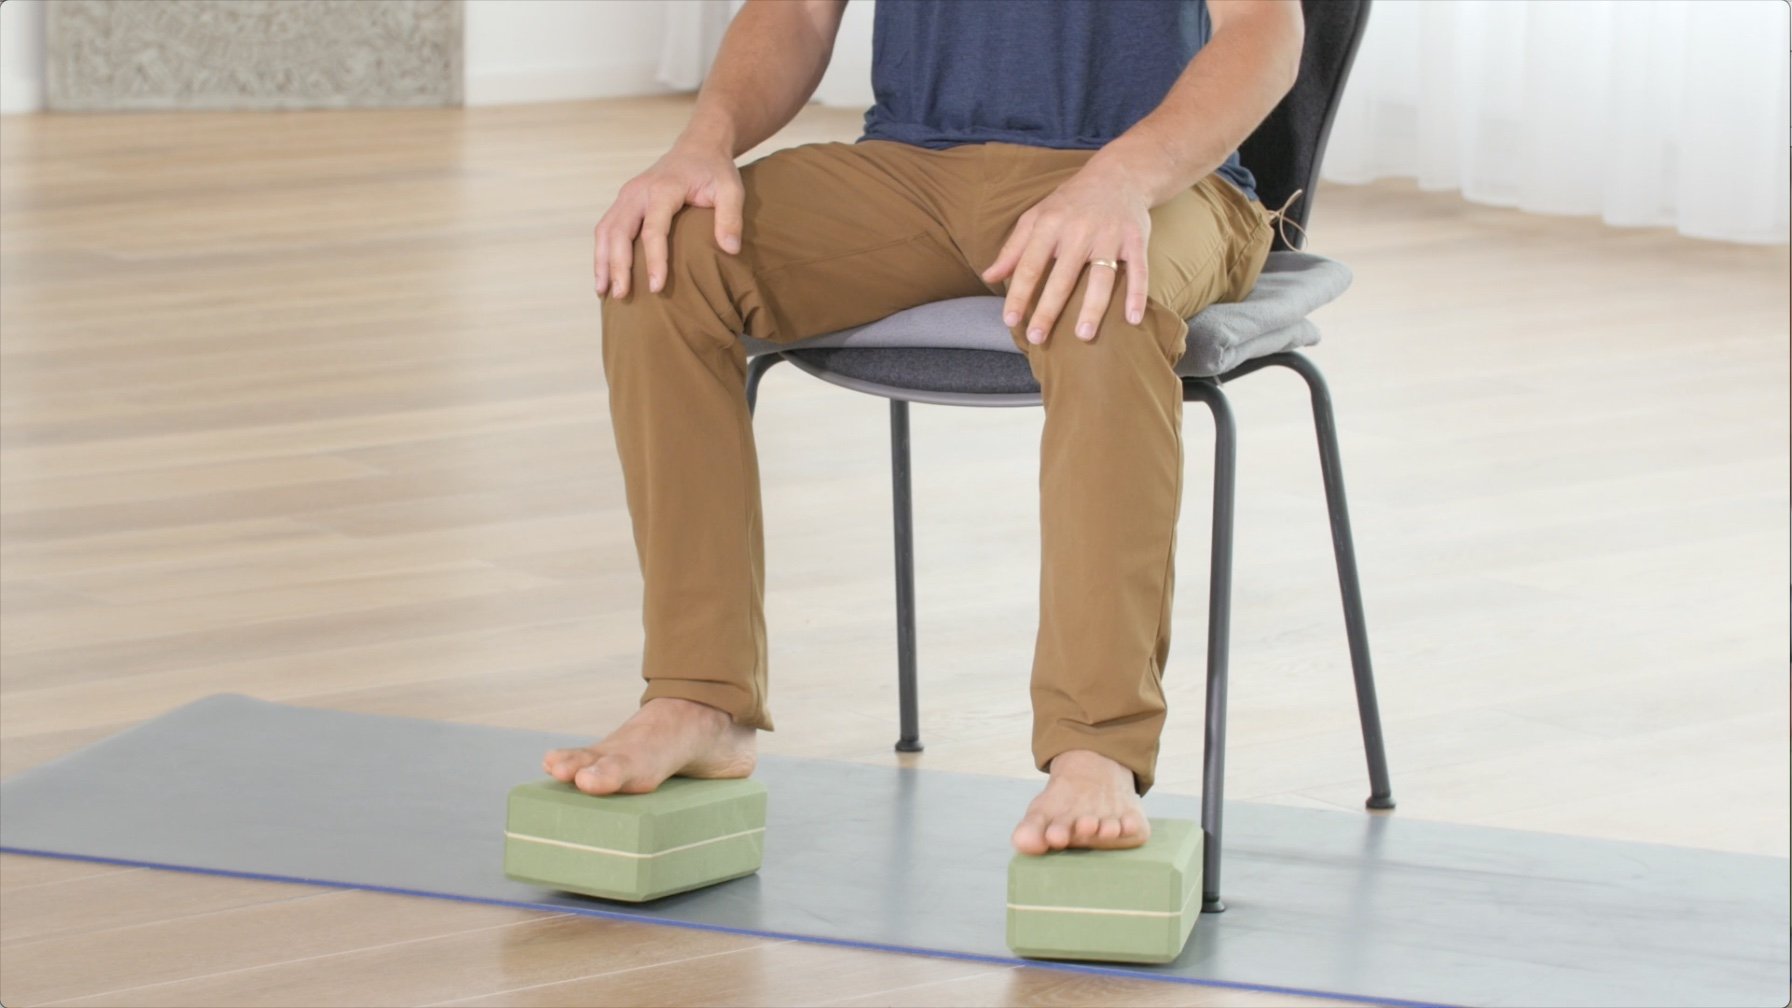
    Option 3: On Chair with Blocks

    In the video I show a seated option call sidasana, however, I wanted to offer one other one here. Sitting in a chair can seem like cheating, as it can be incredibly easy to get too relaxed in it. Here you will notice how I prepare the chair with blocks and a blanket and I sit on the edge of the seat so that I still used my back and hip flexors to keep me upright. Some level of muscle engagement is important to stay awake and present when meditating.

    MOVE•BREATHE•RELEASE

    12 Class Package for Yoga, Pranayama, and Meditation

    • Breathe better with pranayama “breathwork” exercises
    • Release Hip Tension with asana practice
    • Increase Flexibility & Strength
    • Increase Focus and Clarity
    • Decrease Stress
    • Unwind physical & Emotional Tension
    • Move more freely
    • Release low back tension through hip opening
    • 12 All Levels Live Asana Classes
    • Lifetime Unlimited Access to All  

    How to Start Meditation

    The best way to practice meditation, like anything else, is to have guidance. When I was younger, I struggled for years to meditate without the support of a teacher and mostly I became frustrated and lost in my thoughts. When I stumbled upon my teacher “Rudrani” she helped provide me with the tools and guidance to make meditation accessible and enjoyable. This is why I created the MOVE•BREATHE•RELEASE  to share with you the techniques that produce the intended results that so many talk about; peace of mind, inner freedom, focus, mental clarity, joy, equanimity, balance, etc.

    From Body to Mind

    One thing I noticed early on in my meditation practice was the discomfort of my body. I couldn’t focus my mind on anything when I was seated because I was distracted by my back, my knee, my neck, and so on. This realization led me to the physical practice of yoga. Through the yoga practice, I gained a heightened sense of awareness of my body. At first, this was almost a curse because I could feel everything – including my discomfort! Over time and practice, I gained a bit of mastery in my body, in that I could feel the discomfort and choose postures to better accommodate myself and release it. I suggest you choose from one of the 3 best seated meditation postures above and use it for now as your “go-to pose”. I also recommend you get to know the other two poses as well because you will find that on some days your “go-to” is just not the appropriate one for you.

    The seated meditation practice became so much more enjoyable for me when I could extend my attention beyond the physical, knowing that I wasn’t causing damage by forcing myself to sit through knee or back pain. While I do believe that some pain in the body can be a result of mental projection, I also know firsthand that placing love and attention on the body can support the health of the mind.  There really isn’t a divide between brain and body – the mind is a collective of all our physical and emotional experiences. For sound mental health to be our primary state of being we must get to know ourselves on all levels and develop our awareness.

    OTHER HELPFUL PRACTICES

    Hips: Rock & Unlock 'Em

    Get 2 full hours with Matt Giordano focusing on the techniques that increase the range of motion in your hips and provide long lasting freedom. You will have immediate, unlimited access, and can enjoy the benefits today!

    Elements of Mastery Online

    Get the immersion that is offered around the world now in the comfort of your own home. Practice on your own time, when you want, and where you want. Re-watch, study, read, take notes, get into your body, free your mind, and advance your practice with this in depth online immersion

    Continue Learning

    Wake Up Your Wheel Pose

    Wake Up Your Wheel Pose

    Wake Up Your Wheel Poseheart openerWAKE UP YOUR WHEEL POSE We don’t have to question it—we know whether or not we’re feeling open, free, and strong in Wheel Pose. There’s a lightness and expansiveness that takes over when everything falls into place: From the initial...

    read more
    Spinal Spaciousness

    Spinal Spaciousness

    Spinal Spaciousnessdancer poseSPINAL SPACIOUSNESS Some key indicators of spinal health include strong bones, durable yet flexible ligaments, supple discs, and strong supportive muscles. Aside from nutrition, it’s not enough to say that movement in general is enough to...

    read more
    Steps To Scorpion Pose

    Steps To Scorpion Pose

    Steps to Scorpion PosevrschikasanaSCORPION POSE Exhilarating, stimulating, and enlivening are a few words we can use to describe Scorpion Pose. We can also use words such as grounding or even relaxing, which might initially be considered strange descriptors. When we...

    read more
    Heart Opening Education

    Heart Opening Education

    Heart-Opening EducationbackbendHEART-OPENING EDUCATION There is a great deal to learn with regard to heart-opening postures. Of course, negotiating the execution and being aware of the anatomy involved in various heart-opening poses are some of the initial...

    read more
    Pranayama

    Pranayama

    PranayamabreathworkPRANAYAMA Pranayama helps us to more deeply connect to the energy that runs through us. This can be done via a variety of breathwork practices. It’s important to understand that the breath is the physical layer through which we can access prana...

    read more
    Hip Opening Without Knee Pain

    Hip Opening Without Knee Pain

    Hip Opening Without Knee Painhip mobilityHIP OPENING WITHOUT KNEE PAIN "Hip opening” in a yoga class just sounds glorious if we feel confined or constricted in this area of the body and our intention is to transform this experience. The term may not sound glorious,...

    read more

    THE FREE TECHNIQUE PACK

    When You Subscribe, You Will Get Instant Access to

    • the Technique Pack: 15 yoga pose breakdowns
    • exclusive online course discounts
    • exclusive blogs and videos
    • This field is for validation purposes and should be left unchanged.

    BLACK FRIDAY: 30% OFF ALL ONLINE IMMERSIONS & WORKSHOPS !
    0
    days
    0
    hours
    0
    minutes
    0
    seconds
    BLACK FRIDAY: 30% OFF ALL ONLINE IMMERSIONS & WORKSHOPS!
    0
    days
    0
    hours
    0
    minutes
    0
    seconds
    BLACK FRIDAY SALE! Congratulations, your 30% discount code has been applied and will be reflected at the very bottom of the checkout page. All Immersions & Immersion Bundles are included in this sale. To get more info on each immersion click on the photo. On Demand and Lifetime Access To all
    Overlay Image
    BLACK FRIDAY SALE! Congratulations, your 30% discount code has been applied and will be reflected at the very bottom of the checkout page. All Immersions & Immersion Bundles are included in this sale. To get more info on each immersion click on the photo. On Demand and Lifetime Access To all

    Pin It on Pinterest