SHORTEN TO LENGTHEN YOUR STANDING SPLITS INCREASE FLEXIBILITY WITH THIS TECHNIQUEHANUMANASANASHORTEN TO LENGTHEN What does shorten to lengthen your standing splits even mean? Does that even make sense? At first thought it may seem counterintuitive that if you want to...
SHORTEN TO LENGTHEN YOUR STANDING SPLITS
SHORTEN TO LENGTHEN YOUR STANDING SPLITS
INCREASE FLEXIBILITY WITH THIS TECHNIQUE
HANUMANASANA
SHORTEN TO LENGTHEN
What does shorten to lengthen your standing splits even mean? Does that even make sense? At first thought it may seem counterintuitive that if you want to increase your flexibility, you need to shorten. What we’re talking about is shortening muscles in order to find greater length in your hamstrings for this posture. There is a specific technique that supports your ability to increase your flexibility, all while building strength and integrity in standing splits.
PASSIVE VS. ACTIVE STRETCHING
Any variation of splits requires a great deal of flexibility, and because lengthening muscles is non-negotiable to execute this posture, a common go-to strategy in your yoga practice may be to select postures and techniques that passively assist you in this endeavor. This passive assistance might involve using a yoga strap, a wall, and/or the floor to sink into the forces of gravity. These can be effective stretching methods at various times, but if you’re interested not only in lengthening but in the overall health of the muscles that are lengthening, then please introduce yourself to the concept of a Facilitated Stretch (more on this in a bit). This technique asks you to shorten in order to lengthen. A facilitated stretch requires you to be a more active participant in creating stronger and healthier flexibility in your body.

HANDSTAND & MEDITATION
ONLINE YOGA IMMERSION
BREAK THROUGH MENTAL & PHYSICAL BLOCKS
- Learn the most effective drills to safely build your Handstand
- Practice essential meditation techniques to break through mental barriers and build confidence
- Improve focus and breath support right side up and upside down
- Build strength and the necessary skills for balancing Handstand
- 12 classes: All levels appropriate
- Lifetime unlimited access to all
- Attend livestream OR practice the replays any time that’s convenient for you
SALE PRICE: $168.00
FLEXIBILITY? STRENGTH? or BOTH?
In order to achieve standing splits, there must be a level of flexibility in your hamstrings, adductor magnus, and the hip flexors. There must also be an awareness around the movement of your pelvis. However, an element that often gets overlooked is the fact that a great deal of strength is required for the posture.
When preparing for standing splits, Matt explains that the goal is to keep the hamstrings engaged through the entire range of motion. How is this possible? This is where the awareness of the articulation of your pelvis is key. In the video, Matt demonstrates the importance of slowing the tipping of the pelvis on the way down and also tucking the sit bone of the standing leg downwards (this will create more of a posterior tilt of the pelvis).
The rest of the body should stay in one piece to ensure that the movement is occurring from the hamstrings of the standing leg—everywhere else is stable and immobile. This may take some time, due to the patterns you may have created in your body.
WATCH THE VIDEO: SHORTEN TO LENGTHEN YOUR STANDING SPLITS

NEXT TRAINING BEGINS FEBRUARY 2024 ENROLLMENT NOW OPEN!

NEXT TRAINING BEGINS FEBRUARY 2024 ENROLLMENT NOW OPEN!
YOUR BODY’S TENDENCIES
Our bodies just love the familiar, so it will take an incredible amount of focus and awareness in order to go into the places in your body that require more length and strength. This is in fact how you will unlock the posture. You will not only achieve the aesthetic of the posture but also move in the direction of better balance in your body. This also means a reduced risk of injury. Matt always encourages a more intelligent and methodical approach to your practice as a whole, but this method must also be applied as you approach each posture.
No matter your approach, Splits, Standing Splits, Hanumanasana are very demanding and deep postures that may put you at a higher risk, so the activation of muscles is key. This brings us back to the concept of a Facilitated Stretch. What is it, and how is it implemented?

MOBILITY
ONLINE YOGA IMMERSION
- Key techniques to increase flexibility
- Strength development for mobility and range of motion
- Learn postures: Hanumanasana (Splits), Extended Side Plank
- Active and passive mobility for shoulders, hips, and spine
- Improve spinal twists, heart openers, shoulder openers, and hip openers
- Find greater ease in seated postures
- Improve mobility and posture off the mat
- When and how to do active, passive, and isometric stretching
$148.00
FACILITATED STRETCH
If you’re just starting your journey of practicing with Matt, please believe me when I say that you will become the best of pals with this concept. Is it challenging at times? YES, YES, and YES I said that multiple times, but is it effective? YES, YES, and YES again!
A facilitated stretch is when a muscle is engaged while it is in a lengthened position. We have something called Golgi tendon organs which communicate muscle tension back to the brain. When a muscle is both engaged and lengthened, the brain will receive that information and will in turn send a signal back to the muscle that it is safe, therefore allowing it to lengthen more. This is in fact the key to the development of increased flexibility. This is also in fact extremely effective for those of you who may be hypermobile. It creates a sense of control and awareness around your end ranges in a particular posture. We have the ability to facilitate this tension by the articulations we might create with, for example, an action of the pelvis and/or the directional pull of a particular joint against a surface, prop, or other part of our body. Staying closer to a safer amount of activation usually means placing roughly about 20% of effort (or less) into the activation. At the root of it all is your breath, so keep this in mind as we look at the steps Matt provides in order to set up Standing Splits at the wall.
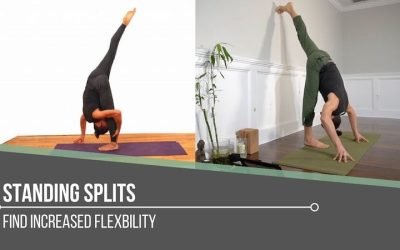
STANDING SPLITS AT THE WALL
- Use hands as a base of support
- Look towards the wall
- Lift right heel (shortens the back line)
- Turn pelvis closed and turn inner heel of the lifted leg to the sky
- Straighten through inner heel of the lifted leg to the sky
- Lower heel of the standing leg back down
- Lean more into fingers and toes as top leg is straightened
*Here’s the opportunity to tap into the facilitated stretch of the standing leg:
8. Standing leg (in this case the right leg) is not passive—microtuck the sit bone down towards your heel so that the hamstrings are engaged
If it feels like you’re strengthening rather than stretching, then you’re on the right track. This is in fact the sensation of a facilitated stretch and what actually increases your flexibility. Rather than causing alarm to your body, it will feel safe to release and lengthen.
A DIRECT LINK TO HANDSTAND
Safety breeds confidence, and the beautiful thing about incorporating techniques like a facilitated stretch into your yoga practice is that you feel both prepared and confident to explore a variety of postures. This exploration allows space for you to work towards postures that may feel “intimidating” or even “inaccessible.”
The specific techniques that Matt has demonstrated for Standing Splits create a direct link to Handstand. The direct link comes from what is required in regard to the setup. Getting into Handstand from the ground up requires a great deal of flexibility and strength. You can find out more about the crossover between these two postures in Matt’s current immersion, Handstand & Meditation.
See you on the mat!
The 200 Hr. Teacher Training: Click Here to See the Next Start Date
The 300 Hr. Advanced Teacher Training: Click Here to See the Next Start Date
Article by Trish Curling
Video Extracted From: Mobility Immersion
CHOOSE YOUR PATH
NEXT TRAINING BEGINS FEBRUARY 2024 ENROLLMENT NOW OPEN!
NEXT TRAINING BEGINS FEBRUARY 2024 ENROLLMENT NOW OPEN!
Continue Learning
SHORTEN TO LENGTHEN YOUR STANDING SPLITS
read more
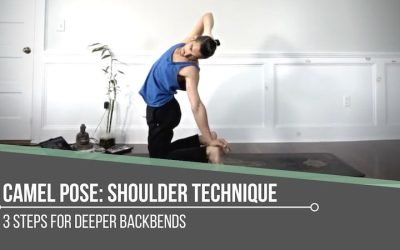
Open Your Heart in Camel Pose
OPEN YOUR HEART IN CAMEL POSE Layer These TechniquesustrasanaOPEN YOUR HEARTThere's such a majestic and robust quality when it comes to heart openers in a physical yoga practice. In order to open your heart and gain greater access to a backbend such as Camel Pose,...
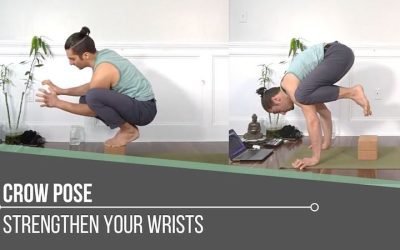
Take Flight in Crow Pose
TAKE FLIGHT IN CROW POSE Strengthen Your WristsKAKASANAWHAT IS THE SECRET TO TAKING FLIGHT IN CROW POSE?In order to take flight in Crow Pose, it may seem obvious that a great deal of emphasis needs to be placed on your hands, but what often happens is that a great...

KICK UP INTO HANDSTAND
KICK UP INTO HANDSTAND Master 3 Key Actions alignmentHANDSTAND—3 KEY ACTIONS “Squeeze in, turn in, tuck the tail.” These are the 3 key actions for handstands that Matt explains are a must. These may sound like simple cues, and they may even be easy to execute if...
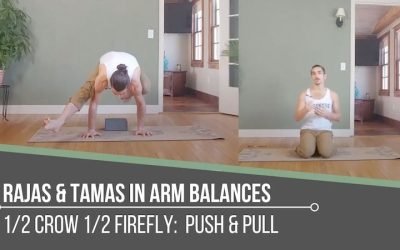
EKA PADA BAKASANA II
EKA PADA BAKASANA II The Essence of Push & PullTHE GUNASTHE GUNAS—The essence of push & pullWe’ve all experienced the essence of push and pull in one way or another. Its presence is evident all around and within us. We all experience the rise and fall, the...
Downward Dog Shoulder Alignment
DOWNWARD DOG SHOULDER ALIGNMENT How Yoga Props Enhance Your Downward DogADHO MUKHAALIGNMENT QUESTIONS IN DOWNWARD-FACING DOGHow many times have you done Downward-Facing Dog in your yoga practice? I can’t answer that either. It’s a posture that shows up in a yoga...
THE FREE TECHNIQUE PACK
When You Subscribe, You Will Get Instant Access to
- the Technique Pack: 15 yoga pose breakdowns
- exclusive online course discounts
- exclusive blogs and videos